How to use Group Posting Pro, from install to autopilot.
Every step, in order, with a picture of every screen. It starts at “what is a Chrome extension” and finishes at campaigns that post for you for months. Nothing is skipped and nothing is assumed — if you can send an email, you can do everything on this page.

Drag the Trigger block here to start
This is the real window, redrawn. Click the five tabs — that is exactly how the extension is laid out.
What do you want to do?
Jump straight to it. Or start at step one and read the lot — it is written to be read in order.
Before you touch anything
This part has three steps. By the end of it, Group Posting Pro is installed in your browser. Its picture sits in the strip of small icons at the top right of Chrome. Its panel — the window where you do the work — is open in front of you, with your Facebook groups already loaded. Nothing has been posted yet — that comes in Part 2.
What this thing actually is
Five minutes of reading here will save you an hour of confusion later. Nothing to click yet.
It is an add-on for your browser, not a program on your computer
Group Posting Pro is a Chrome extension. An extension is a small add-on that installs inside your web browser and adds a new button to it.
That means there is nothing to install on the computer itself. No CD, no download folder, no installer. After you add it, there will be no icon on your desktop and nothing in your Start menu or Applications folder. The only place it appears is a small picture in the strip of icons at the top right of Chrome, next to the address bar. You click that picture to open it.
What it does
You write one Facebook post. You tick which of your groups should get it. Then it posts that message into those groups for you, one group at a time, with a gap between each one, while you go and do something else. It does this through your own browser, using the Facebook you are already signed in to. It works the same way you would by hand — the difference is that you are not the one sitting there doing it.
The product's own words for this, which you will see on your screen during setup, are: It posts from your own Facebook session at human speed — no password sharing, no bots, no risky shortcuts. "Your own Facebook session" there means the Facebook you are already signed in to in this browser.
One phrase first, because it is used everywhere from here on. A group-post means one post going into one group. If you send a single message to five groups, that is five group-posts. That is what the free plan counts.
✓What it is
- A button added to your Chrome browser.
- Something that works your own Facebook account, from your own computer.
- A tool that types and clicks for you, slowly, one group after another.
- Free to start. Five group-posts a day, with no card.
✕What it is not
- It is not a separate Facebook account or a fake robot account. Every post comes from you.
- It does not know your Facebook password. There is no password box anywhere in it.
- It is not a website you log in to. There is no sign-up, no username, no account to create.
- It is not a service running on someone else's computer. The posting itself all happens in your Chrome.
- It is not a way into groups you have not joined. It posts to groups you are already a member of, and the import only ever finds those.
What you need before you start
A proper computer
Windows, macOS, Linux or ChromeOS, running Chrome or Edge. There is no phone or tablet version. If you only have an iPad, this tool will not run for you.
A Facebook account, signed in here
Signed in to Facebook in that same browser, in the account you want your posts to come from. You do not need a Facebook tab open all the time — you only need to be signed in.
Groups you are already in
It imports the groups the signed-in account has joined. If you are not a member, that group is not on the list. (There are separate Find groups and Auto-Join tools for growing the list later — neither has anything to do with getting your first post out.)
Nothing to sign up for, no card
No account, no username, no password given to us, no payment details to start. The free plan gives you 5 group-posts a day. If you have already bought a licence, you paste the key in later.
Meet Dave
Throughout this guide the example is Dave, 54, a sole-trader plumber in Bedminster, Bristol. He does emergency call-outs and bathroom fits. He belongs to 14 local Facebook groups — five neighbourhood groups, three buy-and-sell groups, two landlord groups, and four of the "can anyone recommend a plumber?" sort. He joined them years ago and has never posted in any of them. He has never installed a browser add-on in his life.
Does it store or see my Facebook password?
No — there is no password field in the product, no login form and no sign-in with Facebook. It reads one thing from your browser: whether you are signed in to Facebook right now. It also reads which account that sign-in is acting as: your personal profile, or a Facebook Page. A Page is the separate business page some people run alongside their own profile. That is all.
Do I have to create an account with you?
No. There is nothing to register. If you upgrade later, you are emailed a licence key and you paste that key into the extension. That is the whole of it.
Will it work on my phone?
No. It needs desktop Chrome or Edge on Windows, macOS, Linux or ChromeOS. There is no mobile version.
How to read this guide
Parts 1 and 2 get your first post out. Do those in order, in one sitting, with the computer in front of you. Part 3 is the one nobody should skip — read it before you start sending to a lot of groups at once. Everything after Part 3 can wait until the day you need it; come back and find it then.
Install it
When this stage is done, the Group Posting Pro icon is pinned on your Chrome toolbar and a welcome page has opened by itself.
- Open Chrome and go to the Chrome Web Store listingThe Chrome Web Store is Google's own shop for browser add-ons. The short way to get there: type groupposting.com into the bar at the top of Chrome, press Enter, and click the button on that page that takes you to the Chrome Web Store. If you would rather go straight to the listing, its full address is chromewebstore.google.com/
detail/ — that is long, so copy and paste it rather than typing it out. Either way, you will know you are in the right place because the page is titled Group Posting PRO: AI Auto Poster | Scheduler | Lead Radar for Facebook™.group-posting-pro-group-s/ ihkdflhmhcaldfmliekcmbbfhfeeemie - Click the blue Add to Chrome buttonIt sits at the top right of that page. This button belongs to Google, not to us.
- Read the box Chrome puts up, then click Add extensionA small box drops down from the top of the browser. It lists what the add-on will be allowed to do. Read it — the table below explains every line of it in plain words. Then click Add extension. If you click Cancel instead, nothing is installed and you can start again.
- Pin the icon so it stops hidingChrome tucks new add-ons away behind a jigsaw-puzzle shape at the top right of the browser, next to the address bar. Click that puzzle piece. A short list drops down. Find Group Posting Pro in the list and click the little pin symbol next to it. The icon now sits permanently on your toolbar. This is the button you will click every single time from now on, so it is worth the ten seconds.
- Let the welcome tab openThe moment the add-on installs, a new browser tab opens on its own at groupposting.com/welcome. Its heading reads 🎉 Welcome — let's get your first post live. Nothing on that page is required of you. Read it or close it.
What Chrome is asking you to allow, in plain words
Chrome writes that permission box, not us. Chrome builds it automatically from the nine permissions the add-on asks for, plus its request to run on all sites. Chrome's exact wording changes between Chrome versions, so what you see may be phrased a little differently. Here is what they are actually for.
| What Chrome is asking | What it is really for |
|---|---|
| Read and change all your data on all websites | This is the alarming one. It is that broad for one reason. The panel has to be able to draw itself on whatever page you are looking at when you click the icon. The posting work only ever touches facebook.com. On any other website the add-on marks the page "this is not Facebook", and every part of it that reads page content stops there. Its rules for changing what your browser sends are locked to facebook.com and Facebook's own upload and media servers. The add-on also cannot load code from anywhere on the internet — it can only run the code that came inside it. |
| Store data on your computer | Saves your groups, your saved posts, your settings and your history on your own machine, inside Chrome. There is no small limit on how much it can keep. Your photos and videos can get large, which is why it asks for the unlimited version. |
| Run its own code inside a page | This is how the panel appears inside a web page, and how it does the posting on Facebook. |
| Manage your tabs and windows | So it can open the welcome page, open Facebook for you when you ask it to, and run the working tab that does the posting. |
| Read and change cookies | A cookie is a small note a website leaves in your browser. It reads the Facebook one that says which account is signed in and which Page you are acting as. It writes exactly one cookie of its own, on groupposting.com, to keep track of your free allowance. |
| Change how the browser sends requests | It puts the right labels on the posting requests it sends to Facebook, so Facebook accepts them. These rules are written so they never touch your own ordinary browsing of Facebook. |
| Use alarms | Timers. Checking whether a scheduled post is due, keeping the add-on awake, and the one reminder described in the next row. |
| Show notifications | The little messages that appear in the corner of your screen. One example is when a run has finished — a run is one batch of posting going out to your groups. There is also a single "come back and finish setting up" nudge, about twenty hours after you install, if you never posted anything. One nudge. It does not nag again. |
What you should see when this stage is done
1. The icon, pinned
A small Group Posting Pro picture in the row of icons at the top right of Chrome, to the right of the address bar. It stays there when you close and reopen Chrome.
2. The welcome tab
A new tab that opened on its own, headed 🎉 Welcome — let's get your first post live. It has three numbered steps on it: pin the extension, open Facebook and click the icon, then extract your groups, write and launch.
3. Nothing else
No desktop shortcut. No new folder. No entry in your Start menu or Applications. If you go looking for one, you will not find it, and that is correct.
If you can see that icon, it is installed. Next comes step 3, which opens it for the first time and brings your Facebook groups in. Do it now, while you are sitting there — it takes about a minute.
I installed it but I cannot see any icon.
It is almost always one of two things. First, it never got pinned. Click the jigsaw-puzzle shape at the top right of Chrome. If Group Posting Pro is in the list that drops down, click the pin next to it and the icon comes back onto the bar.
Second, a Chrome update switched it off. Type chrome://extensions into the address bar and press Enter, find Group Posting Pro in the list, and switch it back on. Neither of these touches your saved work — your groups and posts are stored separately, and pinning the icon or switching it back on does not affect them.
Open it for the first time
By the end of this stage the setup screens are done and your groups are imported. The main panel is open in front of you, with its five tabs — the row of names across the top that switch between screens.
Before you click: sign in to Facebook
Open a normal tab, go to facebook.com, and make sure you are signed in with the account you want your posts to come from. Then leave that tab alone. You can now go to any ordinary website — Facebook itself is a fine place to be — and click the pinned Group Posting Pro icon.
Two ways it opens, and why yours may look different
The panel appears in one of two kinds of box, and the browser decides which one without asking you:
- On a normal website — including Facebook — the panel slides in from the right-hand edge of the page itself. It is a tall panel and you can drag its edges to resize it. Clicking the icon a second time slides it back out again.
- On a page Chrome locks down — Chrome's own settings pages, the New Tab page, the Chrome Web Store. Chrome does not allow any add-on to draw on those pages. So the panel opens instead as a smaller window hanging down from the toolbar icon. It closes when you click somewhere else.
It is the same tool, the same buttons, in a different box. The tall in-page panel is roomier, which is the reason both exist. Nothing here is broken — but if it looks different on your laptop than on your desk machine, that is why.
Whichever box it opens in, the first thing you see is a full-screen loading panel with a spinning circle and the line Initializing Group Posting Pro.... Then, about half a second later, the setup card appears on top of everything.
The setup wizard: six screens, about a minute
A wizard is a short series of screens that sets things up for you. This one runs once, on the first opening. There is a thin blue progress bar across the very top of the card so you can see how far along you are.
Screen 1 — it says hello and checks Facebook
- The greeting and the Facebook checkThe small line above your name starts as Checking Facebook…. Within a couple of seconds it should turn green and read Facebook connected, and your name appears: Welcome, Dave 👋. Under it, three ticks go green one after another. If the line turns amber and says Facebook not detected, see the warning box below this picture.
- Which account are we setting up?This list only appears if your Facebook account runs one or more Pages — business pages — as well as your personal profile. Click the one you want to start with. Whatever you click here is the account whose groups get imported in a moment. If you only have a personal profile, this list is not shown at all.
- Already bought a licence?Click Already purchased? Activate your key, then paste the key from your purchase email into the page that opens. Closing that page brings you straight back here.
- The button that starts everythingLet's Begin 🚀. This is the moment your groups are actually fetched, using the account you picked. The small Skip tutorial link on the left needs two clicks to work. The first click changes it to Skip the tutorial? Tap again, so you cannot skip by accident.
Screen 2 — it goes and fetches your groups
This screen is headed Pulling in your groups, with the line We scan your Facebook and import every group you can post to — automatically. While it works you see Importing your groups… and a live counter reading Found 6 so far…, climbing as it goes. Underneath: You can continue the setup — the import keeps running in the background. When it finishes, a big number counts up and a few of your group names appear as small rounded labels.
- Which account it scannedReads Your profile: Dave Whitlock, or Page: Whitlock Plumbing if you picked a Page. If that is the wrong one, click Change — it takes you back to screen 1 to pick again.
- Your numberThe count of groups it found and saved. Dave gets 14, because that is how many he has joined. Under it, up to three of your group names and a +11 more label for the rest.
- The responsibility boxPost to these now → directly below it stays greyed out until you tick it. Read it: you are agreeing to keep the built-in safety delays switched on and not to post spam. This is not decoration. Posting too fast is the thing that gets Facebook accounts restricted. You can carry on to the next screens without ticking it here. But the same sentence comes back on the safety screen, and there you must tick it.
- If nothing came backIf the import finds no groups, this screen instead says We couldn't import your groups yet with a Try again button. The way through is the link Only need a few? Paste your group links. It opens a box; paste one Facebook group web address per line (or upload a CSV file — a plain spreadsheet export), then click Add these groups.
- Two ways forward, and they are differentKeep these — set up my first post → continues to the remaining screens. Post to these now →, higher up, ends the setup immediately. It drops you straight into the composer — the box where you write the post — with a draft written and your groups already ticked. Both are legitimate. The first is the one this guide follows.
Screens 3 to 6 — the ground rules, then you are in
- The safety screenHeaded Post at scale, on your own terms. It explains that posts go out at a human pace rather than in a burst. There is the same responsibility sentence with a tick box — the I Agree button stays greyed out until you tick it. There is also a switch called Warm up my new account, with a small label beside it reading New accounts only. Turn it on only if the Facebook account is brand new. It then deliberately holds back your reach — how far your posts spread — for about a week, so a new account does not look suspicious. If your account has been around for years, leave it as it is. Then click I Agree.
- The optional questionsHeaded Who's speaking? with a small "(optional)" beside it. Four boxes: what your role is, what you offer, a tone (Helpful & Conversational, Professional & Direct or High-Energy & Persuasive), and a link to your website. This is only used to help the built-in writing assistant sound like you. You can leave every box empty — the button is never greyed out. Click Build My Engine.
- A one-second waitA spinning circle and three lines that change as it works: Generating your Workspace..., then Drafting your first AI template..., then Finalizing Workspace.... There is nothing to click and it is over in about a second.
- The last screenHeaded You're set up 🎉. It tells you how many groups it saved and that you are on the Free Plan. It then does the sum for you — how many groups your first posts can reach. Read those numbers — they are yours, not an example. New installs get extra allowance for the first few days, so what it says here may be larger than the ordinary daily limit. Then pick one of three buttons. 🚀 Start posting on the Free plan takes you to the composer with a draft ready; that is the one Part 2 assumes. ⚡ Unlock every group — see Pro opens the upgrade page. I'll explore on my own closes the wizard and does nothing else.
The main panel — your map for the rest of this guide
This is what the wizard drops you into, and it is the screen you will spend all your time on. Everything in Parts 2 onwards is somewhere on this picture.
- Who you are, and what you are allowedThe rounded name badge shows the photo and name of the Facebook profile or Page you are posting as. Click it and a short list opens, headed Post as, so you can switch. Beside the badge is your plan, then a green Upgrade button. On the free plan that plan label reads Free: and then your allowance. On your first days it reads Free: 5 uncapped, because those first runs are not measured against the ordinary daily limit. Once that extra allowance is used up, it settles into a plain count of what is left today, like Free: 5/5. Once you enter a licence key, the whole label reads PRO LICENSE instead. To the far right sit four small buttons: AI Studio, About, Safety and Help, then the ✕ that closes the panel.
- Create Post — where you write and sendThe tab you land on, and the one you will use most. Pick your groups at the top, write the post underneath, and send it with Post Now at the bottom. This is all of Part 2.
- Assets — your groups and your saved postsTwo halves, with a pair of buttons at the top to switch between them. Post Templates holds posts you have saved to reuse. Group Collection holds every Facebook group it imported for you, sorted into named sets. The button that re-imports your groups, Extract from Facebook, lives in there.
- Automations — making it repeat by itselfA builder where you drag blocks together — a trigger, a post, a wait, a loop — so a run happens on a schedule without you. Dave uses this to post every Monday and Thursday forever. Leave it alone until your first manual post has worked.
- Lead Radar — watching groups for people askingWatches groups you choose for words you choose, so that when somebody writes "can anyone recommend a plumber", you hear about it.
- Activity — what is coming and what already happenedAlso two halves. Upcoming lists posts scheduled but not yet sent. History is the record of every run, group by group, with the reason for anything that failed. When something goes wrong, this is where you look.
- The two send buttonsPost Now starts the run immediately. Schedule for Later puts it in the diary instead. Both start out greyed out — that is correct and it is not broken. A line directly above them tells you what is missing: Pick a group collection above to post, or Write a post or pick a template to get started. Fix what it says, and the button lights up blue.
Above the composer you may also see a card titled Get your first post live with a ring showing a percentage. It is a five-item checklist: import groups, create a template, add variations, send a post, activate Pro. Each item has a Go button that jumps you to the right place, except the last one, which says View. It ticks itself off as you work. There is a small ✕ on it if you would rather not see it.
I clicked the icon and nothing happened.
Try clicking it once more. On a normal website the icon works like a light switch: one click opens the panel, the next click closes it. So if the panel was already open behind something, your first click closed it.
If it still does nothing, or opens an empty box, close the panel and open it again. If it keeps happening, restart Chrome. The message the product shows for this is: Group Posting Pro didn't respond. Close this window and open the extension again — if it keeps happening, restart Chrome. Your licence key has not been used up.
The panel looks different on my other computer.
Expected. On an ordinary website it is a tall panel inside the page; on a page Chrome locks down it is a shorter window under the toolbar icon. Same tool, different box.
Note also that everything is stored inside one browser. A second computer, or a second Chrome profile — a separate signed-in Chrome user on the same machine — is a completely separate and empty installation. It has its own groups and its own saved posts.
My group list looks empty after switching to my Page.
That is the design, not a fault. Groups, and the tags you file them under, are kept separately for each profile and each Page. A Page only ever sees the groups attached to that Page, so a Page you have never imported for starts empty. Saved posts work differently: your own library follows you everywhere, and only a post you saved while acting as a particular Page stays with that Page. The setup wizard says so itself: You can switch any time — each keeps its own groups.
Your first post
By the end of this part you will have a real post of yours sitting in real Facebook groups. We start with the groups, because the extension cannot send a post anywhere until it knows which groups you mean.
Bring your groups in
When this stage is done, every Facebook group you belong to is saved inside the extension as a list you can point a post at. You will also have sorted that list into a few labels of your own choosing.
The extension can only post to groups it already knows about. It learns them from the Facebook account that is signed in to this browser. So the first job is to hand it your list.
The setup wizard in step 3 has probably done this already. Screen 2 of it, headed Pulling in your groups, is the same job under a different name, and the number it showed you is your list. If that worked, you are not starting from nothing here: follow the first three steps below to find the Group Manager screen, check your groups are sitting in it, and then go on to Tags, further down this page, which is the part that is genuinely still to do. Run the extract again only if the wizard found nothing, or you skipped it, or the screen you land on says No groups yet. Doing it twice is harmless — nothing is duplicated — but it costs you a few minutes.
You do this once. After that you only top it up when you join something new.
It never asks for your Facebook password. It reads the Facebook account you are already signed in to, on your own computer. What it collects is the same list you would see if you opened your own groups page and scrolled through it.
Where the groups screen lives
The screen is called Group Manager. It is two clicks from the top of the panel.
- Open the panelClick the Group Posting Pro icon in your Chrome toolbar, the same way you did in Part 1. The panel opens.
- Click the Assets tabAlong the top of the panel there are five tabs. Click Assets — the second one. It turns into a solid blue oval with white writing, which is how this panel shows you which tab you are on.
- Click Group CollectionUnderneath the tabs a small two-way switch appears: Post Templates on the left, Group Collection on the right. Click Group Collection. The Group Manager screen opens.
- Click Extract from FacebookThe button Extract from Facebook sits along the top right of the screen, immediately after Find groups. Click it. "Extract" here means "go and fetch". Nothing is changed on Facebook and nothing is posted.
- Read the box, then start itA box appears headed Start Group Extraction?. It warns you that this can take a couple of minutes. It also says that if the quick method does not work, it will open a Facebook tab and scroll through your groups instead. Click OK, Start Scraping.
Extract or import your Facebook groups to start posting and tracking results.
- The two-way switchLeft is your saved post wordings. Right is your groups. You want the right-hand one, Group Collection.
- Extract from FacebookThis is the button that does the work. Next to it, Find groups asks an assistant to suggest groups you are not in yet, and to rank the ones you have. Auto-Join joins new ones for you. Both are paid features, and you do not need either for this step.
- The two little arrowsThe down arrow reads a saved list back in from a file. The up arrow writes your list out to a file. Think of them as backup and restore.
What you see while it runs
After a moment a window opens titled Scanning Facebook... with a big number in the middle of it. The number climbs — 12, then 47, then 118 — as it works through your account. Under the number it says Groups found.
This keeps scanning even if you close this window.
- The countEvery time it finds more groups this number goes up. If it sits still for a long stretch, see "If it stops making progress" below.
- The two lines of small printThey mean what they say. A big account takes longer, and shutting this window does not cancel anything.
- The button, greyed outBehind the window, Extract from Facebook has gone grey and now reads Extracting…. That is how you know a scan is still running. You cannot start a second one on top of the first.
How long it takes depends on how many groups you are in. The extension will not promise you a time, and neither will this page. Its own words are "It might take a couple of minutes" and "Large accounts can take a few minutes." Watch the number rather than the clock.
The batches, and the limits it works to
It does not grab everything in one go. It asks Facebook for your groups fifty at a time, waits a moment, then asks for the next fifty. That pace is deliberate: the extension goes slowly on purpose rather than sending Facebook a great many requests at once.
| What happens | The number |
|---|---|
| Groups fetched per batch | 50 |
| Pause between batches | 1–1.5 seconds |
| Your progress is saved every | 15 batches |
| It gives up on a single batch after | 25 seconds |
| Tries per batch before moving on | 3 |
| Stops if no new group appears for | 90 seconds |
| Stops no matter what after | 20 minutes |
| Runaway stop — after this many batches the scan is marked incomplete | 500 |
If it stops making progress
Sometimes the count stops climbing. If ninety seconds go by without a single new group, the Scanning Facebook... window is replaced by one headed Scan Timed Out. It reads: "The scan stopped finding new groups. Make sure you're still logged into Facebook, then try again." The same screen appears if a scan runs for twenty minutes.
The Extract from Facebook button is no longer greyed out, and now reads Extract from FB. That is the same button under a shorter name. Open Facebook in another tab and check that you are signed in. Then come back to the panel and click the button again. Because the scan saved as it went, you are not starting from nothing.
If a Facebook tab opens by itself
There are two ways the extension can read your groups. The quick way happens out of sight. If the quick way fails, it falls back to the slow way. It opens a real Facebook tab on your groups page and scrolls that page down for you. A message sits over the top of the tab, telling you what it is doing.
When it finishes
A window appears headed Mission accomplished, with a green line telling you plainly what happened. It will be one of these:
- Added 6 new groups (52 found) — it saw 52, six of which it did not already have.
- Already up to date — found 46 groups, nothing new to add.
Underneath, it may add more lines:
- How many were already in your other collections, and it names those collections. A collection is a label you have put groups under; labels are covered further down this page.
- How many groups you deleted were not added back, with a link reading Allow them again.
- In amber, how many saved groups no longer appear on your Facebook account.
That last line is a flag, not a deletion. Nothing is removed from your list.
At the bottom sits a question: Groups missing from this list? with a blue link, Try the visible scan. That is the slow method above, run on purpose. The two methods read Facebook differently, and each can miss what the other sees. That is why the offer appears even when the scan worked. The small print under the link warns that this method is slower, and that it reads group names best when Facebook itself is set to English.
The last line points you at writing your first post. The button Let's post! takes you straight to the Create Post tab. You can instead click the ✕ to close the window and stay here to tidy up, which is what the rest of this stage does.
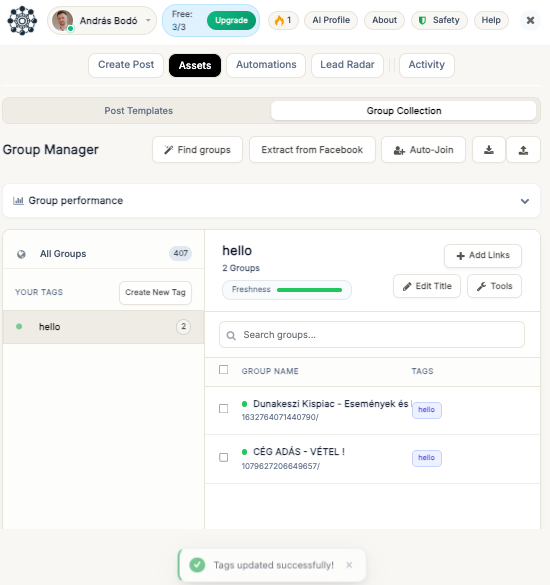
Tags: labels so you can aim at a set of groups
A tag is a label you stick on a group. That is all it is. You can put the same group under several labels, and making a label costs you nothing.
Tags matter because of what comes later. When you write a post you do not pick two hundred groups one by one. You pick one label, and the post goes to every group carrying that label.
- Make the labelClick Create New Tag in the left-hand column. A small box appears, also headed Create New Tag, with the example text "e.g. Real Estate, Crypto..." in it. Type your own name over it and click Create. The new tag appears in the left column with a coloured dot beside it and a count of 0.
- Go back to the whole listClick All Groups at the top of the left column.
- Tick the groups you wantClick anywhere on a row, or click its checkbox. The checkbox in the header row ticks everything you can currently see at once.
- Open the tagging boxAs soon as you tick anything, a bar appears beside the search box. It counts what you have ticked — it reads 3 selected once you have three — and it carries a Manage Tags button. Click Manage Tags.
- Choose the label and apply itThe box is headed Manage Tags for Selected and lists one checkbox per tag you have. Tick the one you want. There is also a field under OR CREATE NEW TAG if you would rather invent one here. Click Apply Tags.
- Check it workedA green message slides up at the bottom of the panel: Tags updated successfully! The count next to the tag in the left column goes up.
Ticking a box adds those groups to that label. Un-ticking it removes them from that label and nothing else — the groups stay in your list.
Dave's three labels
Dave Whitlock is a plumber in Bedminster, Bristol. He is in fourteen local Facebook groups and has never posted in any of them. After his scan finished he made three labels:
Bristol Local
All fourteen. His patch is one city and his offer is the same for everyone in it, so most weeks this is the only label he uses.
Emergency jobs
The four "can anyone recommend a plumber?" groups. These are where a burst pipe gets asked about at eleven at night.
Landlords
The two landlord groups. Different wording — repairs across a few flats, not one-off call-outs.
Same fourteen groups, three ways of aiming at them. A group sitting in "Emergency jobs" is still in "Bristol Local" as well. Labels do not take groups away from each other.
- Your labels, with countsEach tag gets its own colour and shows how many groups carry it. Click one to see only those groups. Click All Groups to come back.
- The search boxType any word from a group's name or its web address. Upper or lower case does not matter. Typing un-ticks whatever you had ticked, so search first, then tick.
- The bar that appears when you tick somethingIt sits beside the search box, above the list. Manage Tags puts the ticked groups under a label. The red Delete Permanently button on the right deletes the ticked groups, and in this view it deletes them from every label at once. It does not ask "are you sure" first — but the message that follows offers Undo.
- The dot in front of a groupThis one is not about the tag. It is about how recently you posted there, which is explained a little further down this page.
The coloured dot: how recently you posted there
Every group row has a small coloured dot at the front. It is about you, not about the group. It has nothing to do with whether the group is any good.
Green — Fresh Group
More than seven days ago, or never. If you have never posted there its words are "You have not posted to this group recently. It is 100% safe to post."; if you have, but more than a week back, "Your last post here was over 7 days ago. It is safe to post again."
Amber — Warm Group
"You posted here within the last 7 days. Proceed with caution."
Red — Hot Group
"You posted here less than 48 hours ago. Posting again so soon risks a spam flag."
Posting into a red group again straight away is the quickest way to look like an advertising machine. That is why the extension's own wording for it is that this "risks a spam flag". Give a group a week if you can.
Above the list, next to the group count, there is a small meter marked Freshness. It shows red, amber and green side by side — the mix across your whole list. Rest your mouse pointer on it and it shows the numbers behind it: Hot (<48h):, Warm (<7d):, Fresh (>7d):. A meter that is mostly green means you have plenty of room to post today.
Searching, ticking and counting
- Search. The box says Search groups.... It matches a group's name or its web address. If nothing matches you get No groups match that search and "Try a different word, or clear the search to see everything again."
- The quick way to build a label. Search for a word that only your target groups share — "Southville", say. Tick the checkbox in the header row to take everything the search left on screen. Then click Manage Tags. Thirty seconds instead of thirty clicks.
- Counts are everywhere. A bubble next to All Groups; a number beside each tag; 14 Groups under the heading; and 3 selected on the bar while you are choosing.
- One exception to "select all". The header checkbox skips any group carrying an amber Not a member pill, and it does that on purpose. You can still tick that group by hand.
If you post as a Facebook Page, that Page has its own list
Plenty of people run a business Page as well as their own profile. The extension treats those as two separate identities, and each one keeps its own groups and its own tags. That is deliberate: a Page is only in the groups it has actually joined, and posting your personal list as your Page would fail. Here is what that does to this screen; step 15 is the full story on Pages.
So if you switch identity using the name at the top of the panel and the group list looks empty — nothing has been lost. You are looking at a different filing cabinet. A blue message appears saying so, with a button that copies your groups across.
- The button on the blue messageIt reads Use my existing groups here. Click it and your personal groups are copied onto this Page.
That button makes a copy. It never moves anything, so your personal list is untouched. When it is done a green message says "Your groups are now available on this Page."
Two more things about Pages, worth knowing before they surprise you:
- To extract a Page's own groups, Facebook has to be acting as that Page at that moment. If it is not, you get told exactly what to do: "Facebook isn't acting as this Page right now. Open Facebook, switch to the Page (top-right menu), close other Facebook tabs, then try again."
- A Page never falls back to the slow visible scan. That method reads your personal groups page, so using it for a Page would give you the wrong list. If a Page extraction fails, you get an honest error instead.
Getting more groups: Find groups and Auto-Join
Everything above works with the groups you have already joined. The two buttons to the left of the arrows are for the day you want more of them. Both need a paid licence; on the free plan clicking either opens the upgrade page instead. Neither is needed for your first post — come back to this when you have run out of groups, not before.
Find groups asks the built-in writing assistant for suggestions. The window is headed AI Group Finder and explains itself: Describe your niche and let AI suggest search terms, warn you off spammy groups, and rank your current groups by fit. Type what you do into Your niche / offer — Dave would put "emergency plumber, Bristol" — and your town into Location (optional). Then use one of the two buttons. Find groups comes back with Search Facebook for and a row of search terms — clicking one opens a Facebook group search in a new tab, where you join the group yourself as you always would — plus Keywords to look for and Groups to avoid. Score my groups instead reads the list you already have and returns Your groups, ranked by fit. It joins nothing and changes nothing; it is a second opinion, and you do the joining.
Auto-Join does the joining for you. Click it in the row along the top of the Group Manager.
- What to look for, and how manySearch Parameter is one subject word — "plumbing", "Bristol", "landlords". How many groups to join? is the number to join in this sitting. Minimum members: skips anything smaller, so you do not fill your list with groups of nine people.
- Where they goTick Save newly joined groups and name the collection underneath. Everything it joins is then filed under that name, ready to post to.
- The button that starts itAuto join groups. A Facebook tab opens in front of what you were doing and works down the search results by itself, joining one group at a time. Leave it alone; it closes itself.
While it runs, a panel sits over that Facebook tab headed GroupPosting is Working, reading Please keep this browser window open. The automation will continue in the background and the tab will close automatically. A line under it narrates each step: Scanning page for new groups..., then Found "Bristol Landlords". Pausing for 12s..., then Taking a longer break for safety (55s)..., and after each one (4/10) Joined "Bristol Landlords". It goes slowly on purpose: the first few are a few seconds apart, the rest are further apart than that, and every seventh join it rests for about a minute. At the end it says Saved 10 groups to collection "Bristol new". and Session complete. Joined 10 groups.
Keeping the list tidy later
You will come back to this screen now and then, though not often.
- Joined some new groups? Press Extract from Facebook again. Nothing gets duplicated — anything you already have is counted as found, not added twice, and the summary tells you the split.
- Left a group? After a full re-scan, a group that did not come back keeps its row and gets an amber Not a member pill. Its explanation: "This group didn't come back in your last full import — you may have left it, or it may have been removed. Nothing was deleted."
- Deleted a group on purpose? It stays deleted. The next scan will not quietly put it back, and it will tell you: "3 group(s) you deleted were not added back." If you change your mind, click Allow them again.
- Which groups are worth keeping? Above the list is a folded row marked Group performance. Click it open and every group you have posted to gets a line reading, for example, 7 of 9 posts landed · last win 2d ago. Before your first run it says No results yet. A group that keeps refusing you has a remove button on its line; taking it out asks Remove this group? first and keeps your history either way.
- List gone too big to handle? The Tools button above the list holds two. Split Master List chops one collection into several smaller ones — you say how many, and it tells you what you will get: Creates 3 collections with 40 links each. Segment by Niche takes a few words separated by commas and makes one new collection per word, from the groups whose name contains it. Both copy rather than move, so your original list is untouched and your totals will look as though they have multiplied.
- Want a backup? The up arrow at the top right saves your whole list to a file called group_collections_export.json in your Downloads. The down arrow reads such a file back in, asking Confirm Import first. It tells you that the imported labels will have "imported -" put in front of their names, so you can tell old from new. If you hand it the wrong sort of file, it says so and does nothing.
Your groups are in and you have at least one label to aim at. That is step 4 finished. Step 5 is writing the post those groups are going to get — and nothing is sent until step 8, so you can still change your mind about all of it.
It found 45 groups but only added 20. Did I lose 25?
No. The other 25 were already saved — perhaps under a different label you made earlier. The summary line names where they are: "already in your other collections", followed by the label names. Your total is on the bubble next to All Groups; check it there.
Some of my groups are definitely missing.
Run the second method. On the Mission accomplished window, under Groups missing from this list?, click Try the visible scan. It opens your Facebook groups page and scrolls it. It is slower, and it reads group names best when Facebook itself is set to English. Anything new it finds is added; nothing already there is duplicated.
I only want a handful of groups, not all of them.
You can paste them in by hand. In All Groups, click Smart Paste at the top right of the list. The box that opens has two halves. The top half is 1. Search Existing Groups, for groups you already have. Below the OR PASTE NEW URLS line is the second half, 2. Smart Paste URLs — a box where you paste one group web address per line.
Then click Add to Tag. Pasted groups are listed as "Imported Group" until you rename them. To rename one, tick it and click Edit.
Write the post
By the end of this step your words are sitting in the writing box. You will also know how they will look when they land in a Facebook group.
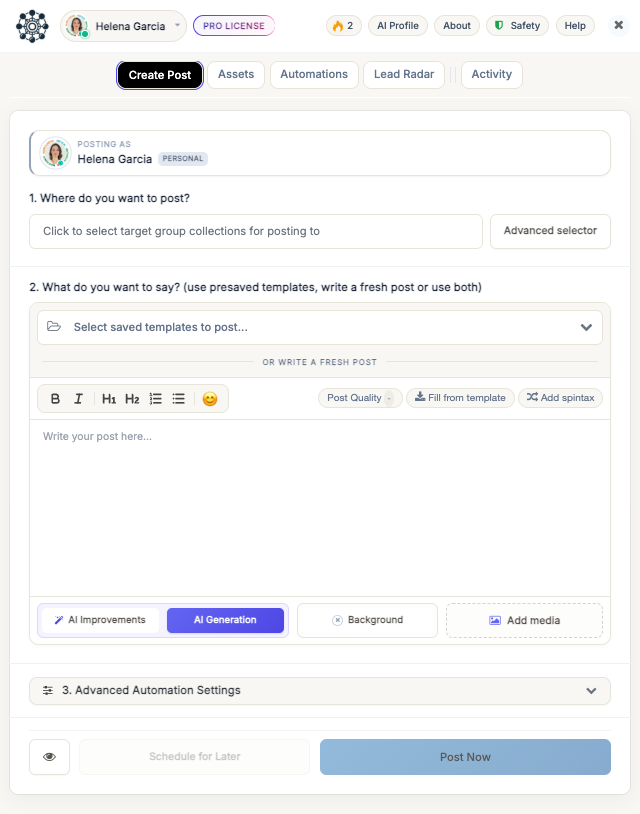
Open the extension: click the pinned Group Posting Pro icon in the Chrome toolbar, the same as in step 3. The panel appears. The first tab, Create Post, is the one selected by default.
This one screen is where nearly everything happens. It asks you two numbered questions, top to bottom. This step answers the second one.
- Who the post comes fromYour photo, your name, and a chip — a small oval label — reading Personal or the name of your Facebook Page. Check this every single time. It is a label only — you change who you are posting as from the name pill at the very top of the panel.
- Where it goesThe box reading Click to select target group collections for posting to, with an Advanced selector button beside it. Step 6 is entirely about this box. Leave it for the moment.
- Your saved postsSelect saved templates to post... pulls in a post you wrote and saved on an earlier day. You have not saved any yet, so skip it.
- The formatting buttonsB for thick letters, I for slanted ones, then two heading buttons. After those, a numbered list and a bulleted list. Last, a smiley that opens a tray of emoji.
- Four small beige buttonsPost Quality shows a score out of 100 once you have written something. Fill from template copies a saved post into the box. Save as template files what you have written away for another day. Add variations is for step 10 — ignore it today.
- The writing boxThe big white area reading Write your post here.... Click inside it and type. This is the one control this step is about.
- The strip of buttons underneathA blue box holds three one-word buttons: Improve, Generate and Ideate. They ask the computer to tidy, write or suggest the words for you. Then come Background and Add media, both of which are step 7.
- The folded drawer3. Advanced Automation Settings holds timing and safety controls. It comes with sensible settings already chosen. Leave it shut for now; a later step opens it.
- The bottom barAn eye for a preview, Schedule for Later, and the big blue Post Now. Post Now stays grey until you have both a post and some groups. The grey line above it always names whichever one is missing.
Type your words
- Click inside the big white boxThe grey words Write your post here... vanish and a cursor blinks. The very first time you click, the writing tools take a second to load. That is normal.
- Type your postExactly as you would type a text message. Do not worry about getting it perfect — you can change it right up until you send.
- Press Enter to start a new paragraphPress it twice to leave an empty line between paragraphs.
- Add an emoji if you want oneClick the smiley at the end of the formatting buttons, on the left of the row. A small grid of faces and symbols opens. Click one and it drops in where your cursor was.
Here is what Dave, a plumber in Bristol, typed for his first post. Short lines, a clear offer, and a phone number.
What survives into Facebook, and what does not
The buttons above the writing box change how the words look. Each one is described to Facebook when the post is sent, so your bold arrives as real bold rather than as stray symbols. Facebook still has the last word on the exact drawing.
| Button | What it does |
|---|---|
| B | Makes the selected words thick. Sent to Facebook as real bold text. |
| I | Makes the selected words lean over. Sent as real italic text. |
| H1 and H2 | Turns the line into a heading. Two sizes. |
| Numbered list | Numbers each line 1, 2, 3. Sent as a real list. |
| Bulleted list | Puts a dot in front of each line. Sent as a real list. |
| Smiley | Opens the emoji tray. Emoji always survive. |
Line breaks — the part people get wrong
- Enter starts a new paragraph.
- Shift + Enter starts a new line inside the same paragraph — useful for an address or a list of prices.
- Both of those arrive in the group exactly as you typed them.
- One empty line between two paragraphs is kept. If you press Enter four or five times to push things apart, those extra blank lines are sent as you typed them on the normal setting, Speed Mode. On Classic Mode the extension trims any run of blank lines down to one. Use the eye-shaped preview at the bottom of the panel to see which you are getting.
What groups accept, and what admins delete
A group admin is a volunteer with a rulebook. Most deleted posts are not deleted for being automated — they are deleted for being an advert dropped into a group that did not want one.
✓Do this
- Read the group's rules first. They are usually in a post pinned to the top of the group. Some groups only allow trade posts on one day of the week. Some do not allow them at all.
- Say who you are and where you work, in the first two lines.
- Break it into short paragraphs. The extension's own advice reads: "Wall of text detected. Hit 'Enter' to create paragraphs for better readability."
- Keep hashtags to one, two or three: "Too many hashtags! Keep it to 1-3 highly relevant tags."
- Add a photo. The extension's tip reads: "Posts with images or videos get 2x more engagement."
- Keep the groups that forbid your kind of post in a separate collection — one of the named batches of groups you built in step 4 — and never post to it. Deleting them loses the record that you are a member.
✕Not this
- Do not type in capital letters. The extension warns: "ALL CAPS looks like spam to Facebook. Please use normal casing."
- Do not open with the price. Open with the problem you fix.
- Do not put a web address in the post body if you can avoid it. The extension's tip: "Contains a link. Tip: Placing links in the 'Auto-Comment' instead can double your reach."
- Do not post the same thing into the same group twice in a day. That is the fastest way to be removed by an admin.
- Do not send word-for-word identical text to a long list of groups. The check that runs when you press Post Now flags exactly this: from ten groups upwards it reads "Identical post text (Spam Risk)", and from twenty groups upwards "Identical post text for 20+ groups (High Risk)". Below ten it says nothing, which is not the same as approval.
Post Quality — the score
Above the writing box, on the right, is a small beige button reading Post Quality. Next to it is a badge — a small oval label. Before you type anything the badge shows a dash instead of a number. Click the button. A box opens underneath the writing box, headed Post Quality Score, with a dial and a short verdict.
- The button and its badgeThe badge shows the score out of 100 and updates as you type, whether or not the score box below is open. A dash means you have not written anything yet.
- The verdictA short phrase that goes with the score. The table below lists them.
- The tipsShort plain sentences telling you what would raise the score. These are the extension's own words, not a summary. One of them mentions spintax — a way of writing one post so it comes out slightly different every time. Step 10 covers it.
| Score | The verdict it shows |
|---|---|
| — | Waiting for content... |
| 0–39 | Needs Work |
| 40–69 | Acceptable |
| 70–89 | Good Job |
| 90–100 | Excellent (Algorithm Optimized) |
What moves the number:
- 15 to 150 words adds 25 points.
- One photo or video adds 20 points. Two or more adds 25.
- An emoji adds 10 points.
- One to three hashtags adds 5 points. More than three takes 5 away.
- A wall of text with no paragraph breaks takes 10 points away.
- Writing in capitals takes 15 points away.
- A web address in the text takes 5 points away.
- The largest single gain, 30 points, comes from the variations covered in step 10.
The score box never uses the word High. That word belongs to a different check — the one that appears after you press Post Now. That check grades the whole run and gives it one of three verdicts: Safe to Fly, Caution Advised or High Ban Risk. Beside them it fills in a second, smaller card headed Spam risk: Low, Medium or High. Step 9 reads both of those with you. A run is everything one press of that button sends.
A High reading nearly always means one thing: identical wording going to a lot of groups at once. Step 10 is the fix, and it takes about thirty seconds.
Look at it before you send — the eye button
At the bottom of the panel, to the left of Schedule for Later, is a small button with an eye on it. Click it. A window opens titled Post Preview. It draws your post the way Facebook would: your photo, your name, the words Just now, and your post underneath. Along the bottom is a Like / Comment / Share row.
At the foot of that window it says This is a preview. Actual appearance may vary. That is an honest warning: Facebook has the final say on how a post is drawn. Close it with the full-width Close Preview button.
Now the biggest mistake of all. Sending the identical post to every group is the most common reason a run goes badly. That is true both with Facebook and with the humans who run the groups. Do not fix it yet: step 10 shows you how to write one post that comes out slightly different in each group. Set aside ten minutes for it.
Choose where it goes
By the end of this step your chosen groups are showing under the first question as chips: small removable labels. The blue Post Now button has woken up.
Back to the top of Create Post, to the first question: 1. Where do you want to post? Underneath it is a wide box reading Click to select target group collections for posting to.
A collection is one of the named batches of groups you built in step 4 — the same thing the groups screen calls a tag. You do not pick groups here. You pick folders of groups.
- A search strip appearsClick the wide box and the list drops down beneath it. A search field reading Search Groups sits immediately above the list. The wide box itself keeps its own wording. Type a few letters to narrow a long list.
- The strip at the top of the listSelect all ticks every collection at once. Once they are all on it changes to Deselect all, and while a search is running it gains a (filtered) ending. Next to it a sort switch flips between Best first and My order. On the right is a running count of groups, not folders: 1 group selected, 14 groups selected, and so on. A group that sits in two ticked collections is counted once.
- The small grey labels on a rowPosted recently, Low engagement and No Page posts. These are advice only. Nothing is excluded because of them — the extension is telling you what it knows, and leaving the decision to you.
- Click the wide boxThe list drops open underneath it. It is a few rows tall, and scrolls if you have more collections than fit.
- Tick the collection you wantClick the small square on the left of a row. It fills in blue with a white tick, and the row goes pale blue. The count at the top of the strip goes up.
- Click anywhere outside the list to close itYour choices now sit under the box as chips, each with a small ✕ to take it off again.
- Look at the bottom of the panelThe grey line reading Pick a group collection above to post disappears. If you have already written your post, Post Now turns bright blue.
- Your choice, as a chipOne chip per collection. Click its ✕ to remove it. Nothing is sent yet.
- Post Now is awakeThe grey hint line above it is gone, and the button is solid blue. Do not press it yet — there is more to add first.
Picking groups one by one instead
Sometimes a folder is nearly right but not quite. For that there is the Advanced selector button, to the right of the box. It opens a window called Advanced Group Selection with three numbered parts:
Part 2 has a search field reading Search across all your groups..., so you can add one named group that is not in any collection. There is also a Review target list section, described on screen as Exclude specific groups from this run, with a Show list button. That is the place to take one group out of tonight's run without changing your folders.
For a normal week you will not need it. Pick a folder and get on with your day.
How many groups on your first day
"All of them" is the wrong answer today. An account that has never posted in a group, suddenly posting in forty of them in one afternoon, stands out. Start small and let the account build a history. For your first run, pick five groups. Five, not fifty. Step 9 explains why five, and sets out how to raise that number week by week. You do not have to read it before you send today's five.
Two things help you count. The strip at the top of the list keeps a running total as you tick. And if you are on the free plan it does the counting for you.
Pick more than the day allows and a line appears reading, for example, 12 selected · only 5 fit today. Beside it is a Fit today's budget button, which trims the selection down for you. It tells you before the run, not afterwards.
Once you have a few runs behind you, a second small chip can appear under the box: 4 groups haven't worked lately, with a Skip them button beside it. Those are groups that have taken your posts three times or more and almost never accepted one. Pressing it drops them from this run only — nothing is deleted, and the chip then reads Skipping 4 inactive groups. If every group you picked is in that state it says so instead: Every selected group looks inactive — add a healthier group.
Dave picked one collection: Bristol Local, his fourteen neighbourhood, buy-and-sell and "can anyone recommend" groups. One town, one offer, one folder. He did not split it, because his service area is a single place and the post is the same for everyone in it. That is fourteen groups on day one, which is more than the five recommended above. Dave can afford it: his Facebook account is years old, his fourteen groups are all one town, and a brand-new install is allowed one run a day of up to 30 groups before the free daily count starts (step 16). If your account is newer than that, or your list is longer, start at five.
You now have words and groups, and the blue button is awake. Step 7 adds a photo, which is worth two minutes because posts with a picture do better. If you would rather not bother today, go straight to step 8 and send it — a photo is never required.
Add a photo or a video
By the end of this step your post carries a picture. You will also know which of Facebook's three looks you are going to get: plain, photo, or coloured card.
Attaching a photo
Under the writing box, on the right, is a box with a dashed edge reading Add media. There are three ways to fill it:
- Click itYour computer's file window opens. Choose one file, or hold Ctrl (Cmd on a Mac) and click several. Click Open.
- Or drag files onto itDrag pictures from a folder and drop them on the dashed box. The box lights up blue while your files are over it.
- Or paste a picture into the writing boxCopy a picture, click in the writing box and press Ctrl + V. The extension catches it and moves it to the photo area for you. A message says so: "Images pasted into the text area have been automatically moved to your Media Gallery for optimal Facebook posting."
Each file appears as a small square below the box. A small red number appears on the corner of the Add media box, counting the files. Each square has a small round red ✕ in its top corner — click that to take the picture off again.
- The dashed box and its countThe red number is how many files are attached. Rest the mouse pointer on the box and a small label appears reading Drag & Drop or Click.
- The small squaresOne square per file. The red ✕ in the corner removes that one file. A video shows as a small player you can press.
- Only appears with two or more filesMedia Spintax (Pools), described on screen as Pick random media so every post looks different. Switch it on and set Select: to a number. Each group's copy then gets that many pictures, picked at random from the pile, instead of all of them.
The rules on files
| Question | Answer |
|---|---|
| How many files on one post? | 10 |
| Can I mix photos and video? | Yes. Photos and videos together, and more than one video, are all allowed. Only the total of ten is capped. |
| How big can one file be? | 35 MB |
| Which kinds of file? | JPEG, PNG, GIF and WebP pictures. MP4, WebM and MOV video. |
A file that is too big brings up Files Too Large, naming the file and asking you to compress it to under 35MB. A kind of file the extension does not handle brings up Unsupported File Type with the line "The following files were skipped:" and the file's name. In both of those cases the rest of your files still attach — only the named ones are dropped.
The ten-file limit behaves differently, and it is worth knowing. If the batch you are adding would take you past ten, a small window appears titled Too Many Photos. It reads "You can attach up to 10 photos per post." And nothing from that batch is attached at all. Whatever you already had stays put. Choose a smaller batch and try again.
What happens to each picture
Before sending, each photo is shrunk so that its longest side is no more than 1920 pixels and saved again. A photo straight off a modern phone is far bigger than that, and sending it at full size would make the run crawl. You will not see the difference on Facebook.
The files themselves are stored on your own computer, inside the browser, until the moment they are sent. Two things follow from that:
- If your computer's storage is full, attaching stops. A window appears headed Couldn't Attach Media, with the message "We couldn't attach that file (your device storage may be full). The media was not added — please try a smaller file or free up space." The file is not attached. It does not go quietly wrong.
- Backups and exports deliberately leave pictures out, to keep them small. If you restore from a backup, or re-run an old post, you attach the picture again by hand.
Does every group get the same picture?
Yes, unless you tell it otherwise. Attach one photo and all fourteen copies of Dave's post carry that same photo. Attach several and switch on Media Spintax (Pools), and each group's copy gets a random pick from the pile instead.
Video
Video works the same way as a photo: same box, same ten-item total, same 35 MB per file, in MP4, WebM or MOV. It appears in the row of squares as a small player.
Two things are different. First, the drawer at 3. Advanced Automation Settings offers two ways of sending. The second of those, Classic Mode, describes itself as Visual automation. Good for video.
Second, after a run that contained video, a blue notice appears above your results: "Video Processing: Facebook requires a few minutes to process videos. Links will become active once Facebook finishes." If you click through to a video post straight away and Facebook says it cannot find it, wait a few minutes and look again. The post is there.
The only limit the extension itself checks on a video is that 35 MB file size — it does not measure length or sharpness. Facebook has its own limits, which are its business and not published here. Try one short clip before you build a week around video.
The coloured background
You have seen these on Facebook: a short post sitting on a solid coloured card in big white letters, instead of small black text on white. That is a Facebook feature, and the Background button is how you ask for it.
- The button and its dotThe small dot on the left of the word Background shows your current choice. It carries a cross when no colour is chosen.
- The paletteClick the button and a small grid opens. The first circle is white with a cross through it and means no colour. After it come ten colours. Click one and the dot on the button turns that colour.
Facebook is strict about when it will honour a colour. It only works on a short, text-only post. In practice:
| The sentence you see | What has happened | Where it appears |
|---|---|---|
| Facebook can't show a background on a post with photos or video. | You attached a picture. A colour is off the table. Take the picture off and it becomes possible again. | Grey line under the writing box; the button goes away |
| Too long for a background — Facebook allows 130 characters. | Your post is longer than 130 characters — roughly two short sentences. A colour is off the table until you cut it down. | Grey line under the writing box; the button goes away |
| Your post contains a link. Facebook usually shows the link preview instead of a background. | There is a web address in your words. Facebook will most likely draw the link card instead of the colour. The button stays and your choice stands: if Facebook fails to fetch that preview, the colour survives after all. | Inside the preview window; the button stays |
| Long posts over a few lines sometimes lose the background — Facebook decides. | Three lines or more. A warning only. The colour is sent, and the preview still draws it. | Inside the preview window; the button stays |
Note the split. For the top two rows, a colour is genuinely impossible. The Background button disappears, and one short grey sentence takes its place directly under the writing box. Nothing has broken. Your chosen colour is remembered, and the button comes back the moment the post is allowed one again — for example when you delete the photo.
The bottom two rows are advice rather than a block. The button stays exactly where it was, and the sentence turns up in the preview window instead — which is where you look to judge the post.
Dave's post is far longer than 130 characters and has a photo of his van attached, so the Background button is not on his screen at all. That is correct behaviour, and it is why his post is drawn below as a plain post with a photo.
Links, and why they are risky
There is no separate box for a web address. You type or paste it into your words like any other text, and the extension finds it. Three things it does for you:
- If you leave off the "https://" at the front, it adds it.
- It fetches Facebook's own preview of that page — the little card with the page's picture and headline — and attaches it to the post.
- If your post ends with the address, it adds a space and a star after it, so the address is not the very last thing in the message. If you see a stray star at the end of a post, that is what it is.
One thing it cannot do: Facebook group posts cannot carry a hidden hyperlink, the sort where a word is clickable and the address is tucked behind it. If you build one of those, it is flattened into ordinary text before sending — the word, then the address, in plain view.
What Dave's finished post looks like in the group
Blocked drain or a tap that won't stop? 🔧
I'm Dave — a local plumber in Bedminster, covering BS3, BS4 and Southville. 24/7 emergency call-outs, and I can usually get to you the same day.
No call-out fee before 6pm. Fixed price before I start, so you know what it costs before I touch anything.
Give me a ring on 07700 900412, or drop me a message here.
Fourteen groups, one photo, one phone number, no web address in the body. That is a post most admins have no reason to touch — though the group's own rules always have the last word. What it still needs is for each of those fourteen copies to read a little differently — and that is step 10.
Do not go there yet. Step 8 sends the post, and for a first run into a handful of groups — which is what step 9 will tell you to do — what you have written is enough. Step 10 is the thing to add before you go anywhere near twenty groups.
Press the button, then read what happened
When this step is finished your post will be sitting in your groups, and you will understand every word on the screen that tells you so.
The two buttons at the bottom
At the very bottom of Create Post there is a strip that stays put while everything above it scrolls. Three controls sit in it: a small button with an eye on it, then two buttons.
Post Now
Sends today. It does not wait a minute, and it does not wait until tonight. The posting engine — the part of the program that does the sending — starts as soon as you confirm. It works through your groups one at a time until it runs out of them. One batch of posting like that, from the first group to the last, is called a run.
Schedule for Later
Sends nothing now. It opens a box headed Schedule Your Post where you choose a date, a time, and how often: ONCE, DAILY, WEEKLY or MONTHLY. Your post waits until then.
Both buttons stay grey until you have done two things: picked at least one group collection, and put something in the post — typed words, a saved template, or just a photo. While a button is grey, clicking it does nothing. A short grey line of text directly above it tells you which of the two is missing. It reads either Pick a group collection above to post or Write a post or pick a template to get started.
- The blue buttonThis is the only control on the whole panel that sends anything. Nothing you have clicked so far has touched Facebook.
What happens the moment you press Post Now
It does not send straight away. There is a confirmation first, on purpose.
- A summary appearsA box opens headed Confirm Posting Details. It shows how many posts are going to how many groups, and how long the run will take. It also shows its own check on how risky the run looks. Read it. Nothing has been sent yet.
- Read the top and the right of that boxA green band across the top counts Manual Time Saved — what this run would have cost you by hand. Under it, plain figures: how many pieces of writing under Content, how many groups under Groups. The card on the right is your last chance to catch a wrong setting. Method: reads API Speed or Classic. Auto-Comment: reads Active or Off. Order: is which post goes to which group. Engine Time: is how long the tool will be working in the background.
- Change your mind hereThe box has two buttons: Post Now and Go Back & Edit. Go Back & Edit returns you to your post with everything still typed.
- Press Post Now the second timeThe screen darkens for about four seconds while a card headed Account Safety Protocol works through its checks — Verifying Facebook session integrity... and three more like it — and finishes on Verification Complete. Then it clears itself out of the way.
- The panel is taken overThe whole panel — tabs, header, everything — is covered by one screen for the length of the run. That is the run screen, below.
- The green badge and the stop buttonThe badge reads Engine Active & Safe and has a slowly pulsing dot. That means it is working. The white Stop Posting button next to it, lettered in red, is how you stop everything. The button to its left, the one with two small arrows, shrinks this screen out of the way.
- The blue ringA circle fills up as it goes. The percentage is inside it and the plain count is underneath — here, 7 groups done out of 14. This is the only place the progress is written. If the ring is not moving, read the line under it: the run is probably in one of its built-in pauses.
- The running commentaryLive Activity, and beside it a rough time remaining. The line above the list changes as it works: Posting safely in the background..., then the name of the group it is publishing to, then things like Safe Interval: Pausing for 2m 14s to mimic human behavior....
- One line per groupEvery group you picked gets a line. It starts as Pending with a small turning circle beside it, then settles on a word. Green Success lines get a View link, whenever Facebook handed back an address for the post. Click that link and the real post opens on Facebook, so you can see it with your own eyes.
The rules while it is running
- Chrome has to stay open. It does not have to be the window you are looking at. Put it behind your email, answer the phone, go and make tea. The extension's own reminder, on the Upcoming screen, says it plainly: Your browser must be open for posts to send.
- Do not quit Chrome. If Chrome is shut in the middle of a run, the groups it had not reached yet come back marked. The reason on them reads Browser was closed during this run.
- If the computer goes to sleep, nothing goes out while it sleeps. Wake it, open the panel, and look. The extension tries to pick a stopped run back up by itself. If it does, the line in the middle reads Waking up background engine... and it carries on.
- You can shrink it and keep working. Click the small arrows next to Stop Posting and the run folds down to a thin bar along the bottom edge reading Posting… with the count. Under it: Safe to edit templates & groups — changes won't affect this run. Click the expand button on that bar to bring the full screen back.
- It is slow on purpose, and the gaps are uneven on purpose. A run of fourteen groups can take an hour. Posting the same thing to fourteen groups in ten seconds is exactly what makes Facebook suspicious. Avoid night posting is switched on from the day you install it, so if a run is still going at 10 in the evening it parks itself. The line then reads Night pause active. Resuming at 7 AM...
How to stop it, right now
This is the control to learn first. It works at any moment while a run is going. You do not have to warn it first.
- Find the red words at the top rightOn the run screen, top right corner: Stop Posting. White button, red text, and a small stop symbol — a square inside a circle. If you shrank the run into the thin bar at the bottom, the same stop button is at the right-hand end of that bar.
- Click it onceIt goes grey and the label changes to Stopping.... The line in the middle of the screen changes to Sending stop signal.... Click once and wait — clicking again does nothing useful.
- Know what stopping does and does not doPosts that already went into groups stay in those groups. Stopping does not delete anything. Every group it had not reached yet is written down as Skipped, with the reason Stopped by user.
- Read the resultsThe run ends there and the results screen appears, showing what it managed to send. Chrome may also show a small notice saying GPP — posting stopped and, for example, Stopped after 6 successful posts.
- If you want a post that already landed taken downThere is no button in Group Posting Pro that takes a post back off Facebook. A post that has landed is an ordinary post of yours now: open that group on Facebook, find your post, and delete it there the way you would delete anything else you have written. The green Success lines on the results screen carry a View link that opens each one for you.
At the very bottom of the run screen sits a second button with a dashed outline: Force Reset Engine. Leave it alone unless the run screen is sitting there with nothing changing for several minutes. It asks you to confirm. Then it stops everything, clears out what is left of the run, and closes the panel by itself. Open the panel again and you are back to normal. Your saved posts and your group lists are not touched by it.
When it finishes: the results
The run screen is replaced by a summary. At the top is a small celebration picture, with one dot for each post that actually landed. Up there too are a badge reading something like About 33 min of manual posting saved and the words Posting completed! Underneath is the part that matters: four boxes and a list.
The very same list is kept forever. Click Activity in the row of tabs, then History, then click any run in the list. You get the identical boxes and the identical table, drawn below. Above that list sits a grid of thirty small squares headed LAST 30 DAYS ACTIVITY — one square per day, darker on your busier days. Click a square and the list below shows only that day; click it again to see everything. The green pill beside it counts the time you saved. Its label has a spelling mistake in the product itself — Time Saved Last 30 Dats. Nothing is broken.
- The four boxesThey are Total, Successful, Failed/Skipped, and an amber Unconfirmed that shows up only when there is at least one. Each box is a button: click one and the list below shows only those lines. Click Total to see everything again. The three lower numbers always add up to the top one.
- The amber warningIt appears only when something came back unconfirmed. Read it before you do anything else on this screen.
- The list, one line per groupThree columns: which post, which group, what happened. On a green line the group name is a blue link. Click it and the real post opens on Facebook. To check first, rest your mouse pointer on the name. A small label reads View Post if there is a post to open, or No URL if there is not. Beside a red or amber word — and now and then beside a green one, when Facebook added a caveat — sits a small circled i. Click it for a box headed Details, with the full reason in it and one OK button. At the end of a line that did not work there is a folder icon, labelled Move this group to another collection, which does exactly that.
- Retry Failed PostsIt offers to re-send only the lines that failed or were skipped. In this example that is 2, not 3 — the amber one is left out on purpose. It only appears if the post it would re-send still exists in your saved templates.
The five words, and what each one means
The reasons, translated
These are the actual sentences the circled i shows you, shortened here to fit. On your own screen you will see the full wording.
| What it says | What it means | What to do |
|---|---|---|
| No permission to post in this group (Facebook: Insufficient permission). If you're posting as a Page, this group may not allow Page posts… | Not a fault at all. That group's own settings will not let you post — often because only admins may post, or because the group refuses posts from a business Page. This is the most common reason of all. | Nothing to repair. If you were posting as a Page, try again from your personal profile, or ask the group's admin to allow Page posts. If it will never work, click the folder icon on that line and move the group into a collection you never post to. |
| You're not a member of this group, so the post was rejected. Join the group first, then retry. | You left that group, or you were removed from it, and you did not notice. | Open the group on Facebook and join it again. Then Retry Failed Posts. |
| Content Unavailable / Broken Link or Group Deleted | The saved address for that group no longer leads anywhere. The group was shut down or renamed. | Go to Activity → History and click Health. It finds groups that fail every single time and offers to take them out of your lists. |
| Facebook accepted the request but didn't confirm the post. This usually means the group requires admin approval, doesn't allow this kind of post, or you're not a member… | This is the one that shows as Unconfirmed, never as failed. Most often the group holds new posts for an admin to approve. | Open that group on Facebook and look. If your post is there, do nothing. If it is not, post there by hand once to find out what that group allows. |
| Action completed but flagged by Facebook Spam Detection. | The post went up, but Facebook has hidden it as suspected spam. | Slow down in that group, and make sure your wording varies between groups rather than being identical everywhere. |
| Facebook session/token expired. Please log in. | You have been logged out of Facebook. The run stops. | Open facebook.com in a tab, log back in, then run again. |
| Your Page session was interrupted — close other Facebook tabs and retry. | Another Facebook tab, open in the background, quietly switched you back from your business Page to yourself mid-run. | Close every Facebook tab except one, switch back to your Page, and run again. |
| Facebook Checkpoint (Account Locked). Please open Facebook and verify your identity. | Facebook wants to confirm you are you. Posting stops until you do. | Open Facebook and answer whatever it asks. Then come back and run again. |
| Facebook temporarily restricted your account from posting (Rate Limit). | Facebook has put a temporary block on your account. The run stops itself immediately so it cannot make things worse. | Stop for the day. Read the next box before you touch anything. |
| Stopped by user | You pressed Stop Posting. Every group after that point is marked skipped. | Nothing. Run again when you want to. |
| Browser was closed during this run. | Chrome was quit, or the computer shut down, while it was working. | Open the panel and use Retry Failed Posts for the groups that were missed. |
Sending them again — and how it stops you posting twice
- To re-send only the missesClick Retry Failed Posts on the results. The button reads Preparing... for a moment, then the run screen comes back and works through only the failed and skipped groups. The successful ones are not touched. Amber Unconfirmed ones are not touched either. That run is saved in History with a Retry badge on it.
- To send the whole thing againThere is no repeat button on the results screen. Close it with the ✕ in the corner, go back to Create Post, and press Post Now again. A repeat you ask for by hand is never blocked — the program assumes you meant it.
- What protects you from automatic double-postingRuns that start on a schedule, or from an automation, are treated differently. Say one of those would put the exact same post into a group that already received it today. It skips that group and tells you so. A blue message appears reading Already posted this today — skipped 5 group(s) to avoid duplicates: followed by the names of those groups. A Got it button clears that message. Groups where the post failed are never counted, so a retry always still works.
- Where that switch livesClick Safety in the top-right of the panel and look for Skip duplicate posts. It is already switched on when you install the extension. Leave it on.
What a normal result looks like
Some groups always fail. That is not a sign of anything wrong.
Dave, the plumber, sent his first post to his 14 local groups. Eleven went in. One came back red, because the community notice board only lets admins post. A second was skipped, because he had quietly been removed from a buy-and-sell group two years ago. One came back amber, because that group holds new posts for a moderator. That is an ordinary run.
Do not chase a column of perfect green — it does not exist. Open the results, glance at the four boxes, deal with the amber one if there is one, and get on with your day. After a few runs you will know which two or three groups never accept anything from you, and you will move them out with the folder button. Then your results get boring, which is the point.
The scoreboard that appears after your first run
Open the panel the next day and there is a new thin strip near the top of Create Post, directly under the Posting as card. It is a scoreboard, like the one on a fitness watch. Before your first successful post it is only a short line of encouragement — Post to your first group to start earning XP, building a streak and unlocking achievements. — with one button reading Start today's post, or Add your Facebook groups if you have not imported any yet.
- The strip itselfA greeting that follows the clock, a star and the rank you have reached, then an orange pill holding your streak — how many days in a row you have posted — and your points. Click the pill and a window headed Your Automation Streak opens, with a square for each of the last thirty days and two cards, Current Streak and Best Streak. Click the arrow on the right to fold the whole thing open or shut; it remembers which you chose.
- This weekFour counts for the last seven days. Saved is worked out at three minutes for every post that landed, so eleven posts reads as about half an hour. Under them, Account health repeats the score from the Safety screen.
- The quest and the badgesA daily target — Post to 10 groups today — and sixteen badges to collect, such as First post and One week strong. Click the row and Your achievements lists all sixteen with what earns each one.
- Smart advisorTwo cards further down. Your week repeats the counts as plain figures. Smart advisor stays quiet until you have about fifteen successful posts behind you, then names the hour you usually post at and your strongest groups.
There are seven ranks, from New poster to Growth legend. Cross a threshold and the next time the strip is drawn a small window pops up — Congratulations! — with a burst of confetti that clears itself after a couple of seconds. One of these red cards can also appear in the strip: 3 groups keep failing you, with Remove these and Not now. That is the same list of dud groups the Health button finds, offered where you will see it.
The part nobody should skip
Everything else on this page assumes one thing: that your Facebook account still works tomorrow. Posting to a lot of groups is a quick way to be seen. It is also a quick way to be shut down. This is the part to read twice.
Keeping your Facebook account safe
When you finish this stage you will know how fast to post, and where that setting lives. You will also know what the shield at the top of the panel is telling you, and what to do if Facebook pushes back.
The honest truth, first
Facebook does not like automation. Nobody outside Facebook knows exactly how it decides, and it does not publish the rules. What is clear from what happens to accounts is this: the trouble comes from how you behave, not from whether the post is any good. The behaviour that gets punished is one account pushing the same message into many groups, quickly.
No tool can promise you will never be restricted. Facebook decides that, not this software, and anyone selling you a "100% ban-proof" poster is lying to you.
This tool does three things. It makes your posting look like an unhurried person doing it by hand. It warns you before a run instead of after. It stops itself the second Facebook pushes back. Each group's rules and Facebook's terms are still yours to obey.
What actually gets people blocked
In order, worst first.
- Too fast. Twenty groups in ten minutes is not something a person does. The biggest cause, and the one entirely under your control.
- Word-for-word the same text everywhere. One wording into twenty or more groups is the worst content mistake there is. Before every run the extension marks that run out of a hundred behind the scenes. It shows you the result on a screen you will meet later in this stage. Word-for-word repetition takes sixty points off that mark.
- The same link in every post. That same screen says it plainly: Same link across many groups can trip spam filters.
- Too many groups on a brand-new account. An account with no history of behaving that way, suddenly posting everywhere, stands out. See Warm-up mode below.
- Posting where it is not wanted. If the group's rules forbid adverts, the admin deletes the post, can report it as spam, and removes you.
- Joining a pile of groups in one day. The screen you use to join groups warns: Facebook limits joins! Max 25 per day recommended.
One more that catches people out: the automatic first comment, which is a comment the tool adds under your own post. If you use it, that comment counts too. The same comment on fifteen or more groups is scored as harshly as the same post.
Pacing — the gap between posts
This is the most important setting in the product. To reach it, open the panel and click Create Post, the first of the five tabs across the top. Scroll to the bottom of that tab, to the grey row marked 3. Advanced Automation Settings. Click that row and it opens, showing the settings drawn below.
- Wait TimeThe gap after each post, in minutes. It arrives set to 2. Dave, the plumber, sets his to 4 for his fourteen local groups. The hint underneath — Randomized duration — is the important part: your number is a starting point, not a stopwatch.
- PacingThree choices. Use my timing (safe minimum gap) is the one it starts on and the one to leave alone. Auto — slower on busy days widens the gaps as your day gets busier. Maximum safety widens them much further once you pass about sixty posts in a day.
- Avoid night postingAlready on, and it should stay on. Its line reads Don't post 10PM - 7AM. A run still going at ten at night parks itself and picks up at seven in the morning.
Interval sits beside Wait Time and is the other half of the pair. It sets how many posts go out before that wait happens. Leave it at 1, so it pauses after every post. Set it to 3 and three posts go out in quick succession — the pattern you are trying to avoid.
One more switch sits in that same block: Safety delay on fail, described as Wait full time even if post fails. It arrives off, which means a group that refuses your post is moved past quickly instead of costing you the full wait. Turn it on if a run has just been throwing failures at you — waiting after a failure as well as after a success is the more cautious way round.
The gap is deliberately uneven. The extension never waits exactly your number. A perfectly even gap is itself a sign of a machine — no person posts at 12:00, 12:04, 12:08, 12:12 for an hour. Your number is treated as a middle, not a stopwatch. Most gaps land near it, some come in shorter, and the odd one stretches out — up to three times what you set, and never further.
Two of the Pacing choices go further than that. Switch to Auto — slower on busy days or Maximum safety and the extension adds a proper rest break on top. About one gap in ten is then stretched to two or three times the usual length, with a ceiling of roughly twenty-five minutes.
It can make a short gap longer. It never makes a long gap shorter. Set a few seconds between posts and it puts a floor under you. That floor is about fifteen seconds, and it rises to about a minute once you pass a hundred posts in a day. Your four minutes stays four minutes.
If you use an automatic first comment, it waits fifteen to forty-five seconds after the post before adding it. A comment that appears in the same second as the post is one of the clearest signs of a machine there is.
The Posting Security Level slider — Fast / Balanced / Safe — is a different thing, and the line under it says so. It only changes how carefully the extension behaves on the page in Classic Mode, the older posting method. Leave it on Balanced.
Drag the two sliders below to see what a run of that size really costs you in time. The answer appears underneath them as you drag.
What to take from it: a safe run is measured in hours, not minutes, and that costs you nothing because you are not sitting there. If the finish time looks too late, cut the number of groups. Never cut the gap.
Warm-up mode — for a new Facebook account
If your Facebook account is brand new, or you have barely used it in years, turn this on before your first run. It lets only a small number of posts out on the first days, then raises that number every day. The account builds up a history, instead of appearing at full volume out of nowhere.
It is off unless you switch it on. The panel says so itself: Off by default. For brand-new Facebook accounts: starts at a lower volume and increases it daily over your first week.
- Turn it onWith the panel open, click Safety — the shield at the top right. The Safety Center opens. Scroll down it to the row marked Warm-up mode (new accounts) and flip the switch beside it.
- Post as normalThe product describes the first 6 days like this: 5 → 10 → 20 → unlimited posts a day. That is five posts on the first two days, ten on days three and four, twenty on days five and six, then no limit.
- You are told before every runA blue line appears in the summary box: Warm-up is on, so 5 of your 20 posts go out today. It steps up each day and lifts completely on <date>. To undo it there and then, click Turn off and post all 20 in that same line.
It counts posts, not groups — twenty groups on day one becomes five. It limits a paid licence exactly like a free one, which is why a new Pro customer is offered the chance to switch it off. If your account is years old and normal, leave warm-up off; it will only hold you back.
The Safety Center — your score out of a hundred
At the top right of the panel is a shield with the word Safety beside it. You do not have to click it to learn something. The shield itself is coloured green, orange or red, and it changes as your settings and your posting change. Click it and the Safety Center opens.
- The shieldGreen at 80 and above, orange from 50 to 79, red below 50. Look at it before every run.
- The score and the line beside itA number out of a hundred, and one plain sentence telling you what it means. All six sentences are in the table below.
- Four facts about right nowThe first row says how your gap is being handled: it reads Human-like, randomized, not your own number. The other three are your pacing mode, how much of today's allowance is gone, and whether you are resting. On the free plan the Daily group cap row reads something like 3 of 5 today. On a paid licence it reads No limit set.
- The four switchesWarm-up mode (new accounts) for a new account. Natural timing nudges scheduled runs off the exact minute. Maximum safety is for pushing high volume. Skip duplicate posts is already on and should stay on.
- Run diagnosticClick it and you get a checklist in plain words. It says whether you are logged into Facebook, and which profile or Page you are about to post as. It also says how many Facebook tabs you have open, which plan you are on, and whether a cooldown — a forced rest — is running. Some lines carry a one-tap fix button such as Open Facebook.
| The line beside the number | What it is telling you |
|---|---|
| Well protected | Green. Your settings match the pacing the product recommends. |
| Protected — pacing yourself | Orange. Nothing is broken, but something is eating the score — usually a good part of today's allowance spent, or a new account with warm-up off. |
| Slow down to stay safe | Red. Fix something before your next run: widen the gap, or cut the groups. |
| Cooling down to keep you safe | Facebook has blocked posting and the extension is resting the account. |
| Daily limit reached — resting your account | Today's allowance is spent. Nothing more goes out until tomorrow. |
| Adapting to a Facebook change | Facebook changed something and the extension is repairing itself. |
Under those rows sit up to two warnings, and four tips that are always shown. Act on the warnings. One of them appears when your last post was nearly the same as a recent one. It reads: A recent post was very similar to another — reword it so each group sees something different.
Daily caps and cooling down
A "group-post" means one post going into one group. Ten groups is ten group-posts.
- Free plan: 5 group-posts a day. The Daily group cap row shows how many of them are gone.
- Brand-new install: the first five runs do not touch that daily allowance of five — one run a day, up to 30 groups per run. The 30 is a deliberate safety cap, and you are shown the number before you post.
- Paid licence: No limit set — no daily ceiling on how many. It is not permission to hurry; every pacing rule above still applies.
- Every night: with Avoid night posting on, everything rests between 10pm and 7am.
- After a Facebook block: automatic posting rests for twelve hours.
If Facebook blocks you anyway
The moment Facebook says the account is restricted, the run stops — on the first block, not after three more tries. A notification appears on your computer: GPP — account safety pause (12h) / Facebook rate-limited your account. GPP paused posting for 12h to protect it. A twelve-hour rest starts, the shield turns red, and a banner sits on the main screen.
- The banner on the main screenIt gives the exact date and time the pause lifts. What happened? opens the Safety Center at the explanation.
- The Cooldown rowTwelve hours from the block. Scheduled posts and campaigns will not fire during it. Posting by hand still works — the panel says so because hiding it would be dishonest, not because it is a good idea.
- The override, and why not to touch itResume automation anyway needs two taps. The first turns the button into Tap again to resume — this can extend the block. The second has to land within four seconds, or the button disarms itself. Read the line under it first. Waiting twelve hours costs you a day; overriding can cost you the account.
What you must do: nothing, for twelve hours. Do not switch to posting by hand in bulk either — Facebook is counting the account, not the tool. Use the time to fix the cause: widen the gap, cut the groups, put three different wordings into the post.
If it happens twice in a week, the Safety Center says it straight. Its line reads: Facebook has blocked actions 2 times this week — consider resting this account for 24–48h. Take that literally. A day or two completely off is cheaper than starting again with a new account.
A verification check is not a block. One notification reads GPP — Facebook needs you to verify / Posting paused. Open Facebook to confirm it's you, then resume in GPP. The run has stopped, but there is no twelve-hour wait. Open Facebook, confirm it is you, then come back and run again.
Same for GPP — Facebook session expired. Log back into Facebook, then carry on.
Before any of that, every run gives you a summary screen headed Confirm Posting Details. It marks the run out of a hundred in the background. What you see is the result: one of three verdicts — Safe to Fly, Caution Advised or High Ban Risk. Under the verdict are the reasons, written as ticks and crosses.
The number itself is never printed; the verdict and the list are what you read. It never refuses to post. It tells you, and you decide.
The rules that keep you posting
✓Do this
- Leave Avoid night posting switched on.
- Keep Wait Time at two minutes or more. Three or more earns the green tick Excellent delay pacing on the confirm screen.
- Leave Interval at 1, so it pauses after every post.
- Give three or more phrases in your post a couple of alternatives each, before you go near twenty groups. The feature that does this is called spintax: one post, written so that it comes out slightly different every time. Three of those turn the check green: Strong Post Spintax (3 blocks).
- Start small. Five groups or fewer is marked Low volume (Safe pacing) on its own.
- Read the Confirm Posting Details screen every time. If it says High Ban Risk, press Go Back & Edit.
- Turn on Warm-up mode (new accounts) if the account is new.
- Spread your runs across the day and across the week.
✕Not this
- Do not send the exact same words to twenty or more groups. That alone takes sixty points off the mark.
- Do not set the wait under a minute with twenty or more groups picked.
- Do not put the same automatic first comment on fifteen or more groups without varying it.
- Do not choose Post ALL to ALL on a big list. That setting, which appears once you pick a second saved post, sends every one of them into every group — the extension puts a red warning on it for good reason.
- Do not press Resume automation anyway the moment you are blocked.
- Do not join more than about twenty-five Facebook groups in one day.
- Do not fix a slow run by shortening the gap. Fix it by picking fewer groups.
Your first two weeks
- Day 1 — five groups, one runPick your five best groups, not all of them. Set Wait Time to 4. Read the confirm screen, then post. That run takes about twenty minutes, and you do not have to sit and watch it.
- Days 2 to 5 — one run a daySame five to ten groups, once a day, gap of three minutes or more. You are building a normal-looking history, which is the whole job of week one.
- Before you widen — write your wordingsPick three phrases in your post. Give each of them two or three alternatives. This is the one change that lets you go from ten groups to thirty safely.
- Day 8 — step up to fifteen or twenty groupsOnly with those wordings in place, Wait Time at 3 or more, and a green shield before you start.
- Days 9 to 14 — twice a week, not twice a dayTwo good runs a week into groups that answer beats seven into groups that ignore you.
- Every run after thatGlance at the shield. Read the confirm screen. If either is orange or red, deal with what it points at before you post.
Making every post different
In Part 2 you wrote one post and sent it to every group on your list. Word for word the same, fourteen times. That is the most common mistake, and the extension's own safety check flags it before it sends. This part fixes it, and it takes about two minutes to learn.
Spintax: one post, a hundred versions
When this stage is finished you will be able to write one advert that comes out slightly differently in every single group, without writing it more than once.
Why this is worth two minutes
Dave the plumber is in 14 local Facebook groups. A lot of the same neighbours are in five or six of those groups. When Dave sends the identical advert to all 14, those neighbours see the exact same words five or six times in one afternoon. It reads like a leaflet pushed through the door twice. People stop seeing it.
The extension notices this too. Before it sends anything, it grades your post. Say your post is going to 10 or more groups, and there are fewer than three places in it where the wording changes. The check then comes back amber — a warning: Identical post text (Spam Risk). At 20 or more groups it comes back red instead: Identical post text for 20+ groups (High Risk).
The fix is called spintax — a way of writing one post so it comes out slightly different every time. You write the alternatives once, inside your post, and the extension picks one of them at random for each group. Fourteen groups, fourteen separate picks. It does not work through the wordings in order — each group gets its own fresh roll of the dice at the moment it posts.
The whole idea, in three lines
You mark a choice with two curly brackets: { at the start and } at the end. On a UK or US keyboard they sit above the square brackets. Hold Shift to type them.
Between the two brackets you write your options. You separate one option from the next with an upright bar — the tall straight line |. It usually sits near the Enter key, or above the backslash.
One choice, two options. Type this:
The extension reads the brackets as "pick one of these". So that line comes out as either Hi everyone! or Hey everyone!. Some groups get one, some get the other.
One choice, three options. Add another bar and another wording. There is no limit on how many you list:
A whole sentence with three choices in it. This is what real spintax looks like:
Everything outside the brackets stays exactly as you typed it. Only the bracketed bits change.
How the versions multiply
This is the part that surprises people. The choices do not add up — they multiply.
That last example has three choices in it. The first has 3 options. The second has 3 options. The third has 3 options. So the number of different posts you can get is:
You typed one post. You now have 27, and Dave only needs 14. Add one more three-way choice and it becomes 81. That is why four or five small choices is usually plenty. You do not need to put a choice around every word in the advert.
Press Roll again a few times. Each press is one group getting its post. That is exactly what happens on Facebook, 14 times over.
The four rules, and what happens if you break them
Every one of these was tested on the real extension. The first column is what you type. The second is what actually lands in the group. The third says why.
| What you type | What gets posted | Why |
|---|---|---|
| {Hi|Hey|Hello} everyone! | Hi everyone! or Hey everyone! or Hello everyone! | A normal choice. This is what you want. |
| Use promo code {SAVE20} | Use promo code {SAVE20} | No upright bar, so it is not a choice. The brackets are printed exactly as typed. |
| unbalanced {a|b | unbalanced {a|b | The closing bracket is missing, so the extension leaves the whole thing alone. |
| { Hi | Hey } there | Hi there or Hey there | Spaces you put inside the brackets are tidied away. Keep your spaces outside. |
| {Thanks everyone|} | Thanks everyone | Every time. A blank option is thrown away. It does not mean "sometimes say nothing". |
A choice inside a choice
You can put a choice inside another choice. The extension works from the inside outwards. You do not need this to get the benefit, but it is there if you want it:
Three results, not six. The words "there" and "everyone" only exist inside the "Hi" option. If the extension picks "Hello", it never looks inside at all. Count the brackets carefully when you do this. Miss one and stray brackets end up in the post for everyone to see.
Where you type it in the extension
You do not have to type brackets yourself. There is a small window that builds them for you, and it is the safest way to start.
- Write your post normallyClick the extension's icon on your Chrome toolbar. The panel opens on the Create Post tab. Type your advert into the big white writing box the way you would say it out loud. No brackets yet.
- Highlight the words you want to changeDrag across a few words with the mouse — say the opening line, or "Give me a ring". The words go blue, the way they do in any writing program.
- Watch the button change its nameIn the row of small buttons above the writing box there is one with a crossed-arrows icon. With nothing highlighted it reads Add variations. The moment you highlight something it changes to Vary selected text. That change is how you know the extension has your words.
- Click itA small window opens titled Create Spintax Variations. The words you highlighted are already sitting in the first line. The second line is empty and waiting.
- Type your other wordingsPut a second way of saying the same thing in the second line. Click Add Another Variation for a third, a fourth, and so on.
- Look at the previewUnderneath, Live Preview of the variations shows one of your wordings picked at random. Click Shuffle to see a different one. That button stays greyed out until you have at least two wordings filled in.
- Click the blue buttonClick Add spintax. The window closes and the brackets appear in your post, in the exact place your highlighted words were.
- Do the same for a few more phrasesRepeat for three or four other phrases. Three separate bracket groups is the number the extension's safety check wants to see.
I'm Dave — a local plumber in Bedminster, covering BS3, BS4 and Southville.
{Give me a ring|Call me|Drop me a message} on 07700 900412.
- The button that builds the bracketsIt reads Add variations normally and Vary selected text when you have words highlighted. If the panel is narrow the words disappear and only the crossed-arrows icon is left — it is still the same button.
- Your post, with two choices in itOn your screen the bracketed parts turn blue within about a second of you finishing them. Everything else stays black.
- One line per wordingThe first line already holds the words you highlighted. You type the rest. Every empty line shows the placeholder Enter a variation... until you fill it.
- Auto-Fill with AIThis button only appears if you opened the window with words highlighted, and it needs a paid licence. It writes three to five alternative wordings for you.
- ShuffleRolls the preview again so you can read another version. It does nothing to your post — it is only for looking.
- Add spintaxThe blue button. This is the one that puts the brackets into your post and closes the window.
Two other places spintax lives
- Your first comment. Open 3. Advanced Automation Settings, choose Add First Comment, and there is a second Add spintax button sitting above the Auto-Comment Content box. It opens the same window. The comment gets its own roll of the dice, separate from the post, so one group can get a different opening and a different comment. If you are commenting on 15 groups or more and the comment has no choices in it, the check before sending turns red: Identical Auto-Comment (Spam Risk).
- Let the AI write the brackets. AI here means the computer writing for you. Under the writing box there is a row of three buttons: Improve, Generate, Ideate. Click Improve and a set of cards appears; one of them is Spintax Architect, described as "Convert text into complex nested variations {A|B} for safety." It takes the post you already wrote and puts the choices in for you, so read what it gives you back before you send it. It is a machine guessing at your trade, and it sometimes swaps a word you would never swap.
Five mistakes that catch people out
1. A bracket left open
This is the most common one, and it fails in silence. Miss the closing bracket and every group gets exactly what you typed, brackets and all.
2. Brackets with no bar in them
Nothing to choose between means it is not a choice, so it is printed as written.
3. Putting a choice inside a web address or a hashtag
Put the whole address inside as one option, never half of it. Half an address inside the brackets can produce a web address that does not exist. A hashtag has the same problem. A blank option is thrown away, so you always get the longer version.
4. Putting a choice around so much that it stops sounding like you
You can put a choice around every word in the advert. Do not. Every option you write is a sentence a real customer will read. If a machine shuffled the words, the reader can usually tell. Put choices only around the parts that genuinely are interchangeable — the greeting, the sign-off, "same day" against "within 24 hours" — and leave your actual offer alone.
✓Put choices around these
- The greeting: {Hi|Hey|Hello}
- The problem you fix: blocked drain, dripping tap, boiler playing up
- How to reach you: ring, call, message
- How fast you can come: same day, within 24 hours
- The sign-off or the last line
✕Leave these alone
- Your phone number, price, or address
- Your own name and business name
- Anything half-way inside a web address
- The thing you are actually selling
- Words where one option would be a lie
5. Forgetting that the shortest option is a real post
Whichever option gets picked, that is what the group sees, and nothing else. If one of your three openings is two words long and the others are a sentence, then a few of your groups get a two-word opening. Read each option on its own and ask "would I be happy if this was the only one that went out?" Never leave an option blank hoping for a shorter version — blanks are thrown away.
Ready-made posts you can copy
These are complete, working posts. Copy one, change the names, numbers and places to yours, and it is ready to send. Under each is what two different groups would actually receive.
Plumber — emergency call-outs (81 versions)
I'm Dave — a local plumber in Bedminster, covering BS3, BS4 and Southville.
{24/7 emergency call-outs|Emergency call-outs, day or night|Out to you the same day, most days}.
{No call-out fee before 6pm|Fixed price before I start|You get the price before I touch anything} — no surprises on the bill.
{Give me a ring|Call me|Drop me a message} on 07700 900412.
I'm Dave — a local plumber in Bedminster, covering BS3, BS4 and Southville. 24/7 emergency call-outs.
No call-out fee before 6pm — no surprises on the bill.
Give me a ring on 07700 900412.
Boiler playing up and it can't wait? 🔧
I'm Dave — a local plumber in Bedminster, covering BS3, BS4 and Southville. Out to you the same day, most days.
Fixed price before I start — no surprises on the bill.
Drop me a message on 07700 900412.
Plumber — filling the diary with boiler services (48 versions, with a choice inside a choice)
Hi everyone — quick reminder: I'm booking in annual boiler checks for this month. £85, no call-out fee.
Mobile hairdresser (256 versions)
Hello ladies! I'm a mobile hairdresser in Cork. Cut & blow dry from €25. DM me to book.
Café or bakery (96 versions)
Fresh sourdough this morning at the shop. First come first served — it goes fast!
Handyman and odd jobs (72 versions)
Bits and bobs around the house piling up? Shelves — I take care of it. Fully insured. Message me for a quote.
Selling a car privately (128 versions)
Selling: '14 plate Ford Focus, 98k miles, long MOT. £2,450 ono. Message me for more photos.
A first comment, for when your link goes in the comment (12 versions)
Happy to answer any questions — I'm about most days. 👍
What you should see before you send
When you press the button that sends the post, the extension shows you a check first. If you have done this right, somewhere in that list is a green tick: Strong Post Spintax (4 blocks). The number shown there is however many bracket groups you wrote. Three or more gets you the green tick. One or two gets an amber warning instead: Weak Post Spintax (Only 2). That warning costs you points on the safety score.
That number counts bracket groups, not finished versions. Four bracket groups can still add up to 81 different posts.
And a last honest word. Swapping "Hi" for "Hey" does not make a genuinely different advert. The shape of it, the order you say things in and the length are the same either way. Spintax stops your groups seeing word-for-word repeats. Writing two or three genuinely different adverts and rotating those is what makes you look like a person rather than a noticeboard.
Save it once, use it forever
By the end of this step you will have your post saved under its own name, so you never type it twice again.
A template is a post you have written and kept. It holds the words, the photos and the background colour together, under a name you choose. Next week you pick the name off a list instead of writing anything.
Templates live on the second tab, Assets. That tab has two halves. A switch at the top says Post Templates on the left and Group Collection on the right. Your saved posts are on the Post Templates side.
The quick way: save what you have just written
- Write the post firstOn the Create Post tab, type your post into the big white box.
- Click Save as templateIt is one of the small beige buttons in the row above the writing box: Save as template.
- Give it a nameA small window opens with a field called Template name. It is already filled in with the first few words of your post. Type over it with something you will recognise — Emergency call-out, not Post 1.
- Save itClick Save in that window. A green message slides up from the bottom: Template saved — find it under Templates or the template picker. “Templates” there means the Assets tab.
The full way: build the template from scratch
- Open the tabClick Assets, then make sure the left half of the switch, Post Templates, is the one selected.
- Start a new oneClick Create Template at the top right. The list is replaced by an editor with the heading Create Template.
- Name itType into Template Name. You get 50 letters and no more — a small counter beside the label counts up, 0/50, and stops you at the end.
- Put it in a category, if you want oneThe box beside the name is labelled Categories and reads Assign... until you fill it. Categories are folders for your templates. You can leave this empty.
- Write the postThe big box below shows a grey reminder until you start typing: Start writing your post here... Under it a line reads Multi-level spintax is supported. That is the curly-bracket writing from Step 10, and it works here too. Type your post. The buttons above the box are the same ones as on Create Post: bold, italic, the two heading sizes, the two list buttons and the smiley. Beside them sit Post Quality and Add variations. The two template buttons, Fill from template and Save as template, are not here, because you are already inside a template.
- Attach photos and a colourUse the same dashed media box and the same Background button you used on Create Post. Underneath the box a line counts your letters: 412 characters. Once the post is down to 130 characters or fewer — the longest Facebook will put a colour behind — that line adds a green (background eligible).
- SaveAt the top right, next to Cancel, click Save (the button with the small floppy-disk picture on it). You go back to the list and your template is in it.
Two things will stop the save, and both say what is wrong. With no name: Please name this template before saving. With nothing written and no photo: Add some content or media before saving this template.
I’m Dave — a local plumber in Bedminster, covering BS3, BS4 and Southville.
- Template Name50 letters maximum. The counter beside the label shows how many you have used.
- CategoriesA folder name. Optional — leave it on Assign... if you only have a few templates.
- The A B C D buttonsFour separate wordings inside this one template. They are explained below.
- The post itselfThe words, exactly as the groups will see them. Curly brackets are allowed here and are explained in the table below.
A, B, C and D — four posts in one template
Beside the words Auto-Variations there are four small buttons: A, B, C, D. Each one holds a completely separate post. Clicking a letter swaps the whole writing box over to that letter's text. A is where you start.
When the template is sent, each group gets one of the letters you filled in, picked at random. You do not choose which group gets which. Write only A and every group gets A. Write A and B, and each group gets whichever of the two the draw gives it, so your groups come out as a mix of the pair.
People mix up variations with spintax, because both make your posts come out different. They are not the same thing, and you can use both at once.
| Variations A B C D | Spintax | |
|---|---|---|
| What it is | Up to four whole, separate posts, kept together under one template name. | Alternative words inside one post, written between curly brackets. |
| What it looks like | Four buttons at the top of the editor. | {Hi|Hello|Morning} inside your text. |
| How many you get | 4 | As many brackets as you like. Four brackets with three choices each is 81 possible posts. |
| What one group sees | One of the letters you filled in, whole, picked at random. | One word picked at random from each bracket. |
| Use it when | The messages are genuinely different — a call-out advert and a boiler-service advert. | It is the same message, said in slightly different words. |
The list, the preview and the buttons above them
Back on the Post Templates list, the screen is split in two. Your saved posts are on the left. Click one and the right-hand side fills up with a mock-up of how it will look on Facebook. You see your photo, your name, Just now, the words, and Like / Comment / Share along the bottom.
I’m Dave — a local plumber in Bedminster, covering BS3, BS4 and Southville. Emergency call-outs, day or night.
Call me on 07700 900412.
- Create TemplateStarts the empty editor you saw above.
- Import from profileIf you also post as a Facebook Page, this copies templates from that Page across to whichever profile or Page you are posting as now. It asks Copy from, then Choose what to import, then Import selected. Nothing is moved or deleted — it is a copy.
- CategoriesOpens Manage Categories, where you type a name into Add New Category and click Add. Names are limited to 25 letters. The neighbouring Sort & Filter button then lets you sort by name and show one category at a time.
- Spin TextRe-rolls the preview. Every click draws a different set of words out of your curly brackets, so you can see three or four of the versions your groups will actually get.
- The previewA mock-up, not a real post. Nothing has been sent.
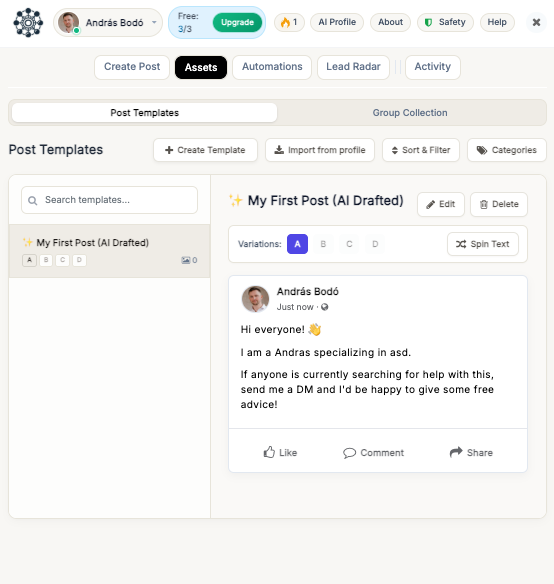
Dave builds three templates
Dave is a plumber in Bedminster, Bristol. He is in 14 local Facebook groups. He does not want to write a post every Monday morning, so he writes three, once, and lets them take turns.
1. Emergency call-out
The workhorse. Blocked drains, dripping taps, dead boilers, his phone number, and the promise of a fixed price before he starts. Category: Emergency. Four sets of curly brackets in it, so his 14 groups do not all get the identical wording.
2. Boiler service — autumn
Seasonal. He turns it on in September and off in December. One photo of a serviced boiler. Category: Seasonal. He wrote it twice, once in A and a shorter version in B, so the groups do not all get the identical wording.
3. Hello, I’m Dave
No selling. Who he is, which streets he covers, 22 years on the tools, and a question at the end so people reply. This is the one that makes the other two work, because people recognise the name. Category: Friendly.
To rotate them, he goes back to Create Post and ticks more than one template in the Select saved templates to post... box. As soon as two are ticked, a new section appears. It offers Split (1 per group), which is the default and carries a green Safe tag, or Post ALL to ALL.
Split (1 per group) gives each group one of the three. Post ALL to ALL gives every group all three, which is three times the posting and reads like advertising. Dave leaves it on Split (1 per group).
When he later sets these to repeat on a timetable — daily, weekly or monthly — a tick-box called Rotate templates each run appears in the schedule window. It only turns up on a repeating schedule, and only alongside Split (1 per group). On a one-off run, or with Post ALL to ALL, there is nothing left to rotate. Its own description explains it: Each run shifts by one, so every group eventually gets every template. Group one gets the call-out advert this Monday and the boiler advert next Monday.
Letting the AI write it
By the end of this step the tool will be able to write a post for you, in words that sound like yours.
There is a writing helper built in. Think of it as a copywriter — someone who writes adverts for a living — sitting inside the panel. It does one job: it writes the message you are about to post.
What the writing helper can and cannot do
✓What it can do
- Write a whole post from a sentence of instructions.
- Tidy up, shorten or sharpen a post you wrote yourself.
- Write in your language. It reads what you typed and answers in the same language.
- Learn your writing style from posts you have written, and copy it.
- Put the curly-bracket alternatives in for you, automatically.
✕What it cannot do
- Make pictures. Not one. Every photo and video in your posts is a file you upload yourself.
- Know your prices, your town, your phone number or your reputation — unless you tell it.
- Know whether a claim is true.
- Post anything. It only fills the writing box. You still press the button.
Where the buttons are
Directly under the big writing box there is a small coloured box with three one-word buttons in it: Improve, Generate and Ideate. The same three sit under the writing box on Create Post and inside the template editor. They are in that order on purpose: fix what you wrote, write from your instructions, or get ideas when you have nothing at all.
- The three AI buttonsImprove rewrites what is already in the box. Generate asks you what the post is about and then writes it. Ideate shows you the next two weeks and suggests things to post about. While one is working the box is covered by a small spinning circle and the word Working...
- The counterBefore you have used it, this small grey label reads 5 free AI drafts included. After that it counts down: 3 of 5 free AI drafts left. When they are gone it turns amber and reads Free AI drafts used — see Pro.
Generate, or Improve? The difference in one line
Generate is for a blank box. Improve is for a full one.
Use Generate when…
You know roughly what you want to say but not how to say it. You type one sentence of instruction — “I service boilers in Bristol and want September bookings” — and it writes the post. If the box is empty it does not matter; it is starting from nothing anyway.
Use Improve when…
You have already typed something in your own words and want it fixed or made shorter. It needs text in the box: while the box is empty the Improve button stays greyed out and will not respond. Type a line and it comes back to life.
Generate: the form it asks you to fill
Clicking Generate opens a form headed GroupPostingAI Post Generator. It remembers what you typed last time and puts it back for you.
- What should this post be about?The only part you must fill in. One or two sentences is plenty. Leave it empty and you get a window headed Input Required saying Please tell the AI what this post should be about.
- The three ready-made startersClick one instead of typing and it fills the box for you. If today is a special day, a fourth one appears for it.
- Choose a ToneThree, and only three: Helpful, Professional, Promotional. Helpful is already picked.
- More optionsClick it and two more things fold out: Target Audience (Optional), and two switches, Add Emojis (already on) and Add Hashtags (off).
- Generate PostOr hold Ctrl and press Enter. The form closes, the spinning circle appears over the writing box, and the finished post lands there a few seconds later.
Improve: four ways to fix what you wrote
Clicking Improve opens a window headed Choose Enhancement Style, under the line Your text stays yours — the AI just makes it work harder. Four cards. Click one and it happens.
The fourth one, Spintax Architect, is the one to know about. It takes the post you wrote and puts the curly-bracket alternatives in for you, all through it, without you choosing a single word.
The curly brackets are meant to be there
Every post the AI writes comes back full of them. It looks broken. It is not.
I’ve been {building|making} solid-oak desks in my garage for {six|6} years now.
{Message me|DM me} if you want one before the weekend.
I’ve been making solid-oak desks in my garage for 6 years now.
DM me if you want one before the weekend.
Teaching it about your business — AI Studio
At the top of the panel, in the row of small buttons, there is one called AI Studio. Click it once and fill it in. Every post the AI writes afterwards is better, because it stops guessing what you do for a living.
- Enable Business ContextThe switch at the top. While it is off, everything below it is greyed out and ignored. Turn it on first.
- Your Identity / RoleWho you are, in a few words. Dave puts Emergency plumber, 22 years on the tools. Not “plumbing professional” — write it the way you would say it to a neighbour.
- Your Default ToneA drop-down with five choices: Helpful & Conversational, Professional & Direct, Witty & Engaging, Empathetic & Soft-Selling, High-Energy & Persuasive. Dave leaves it on the first.
- Core Offer / ProductWhat you actually sell, and where. Dave puts 24/7 emergency call-outs and bathroom fits, BS3 and BS4. Beside it, Default Call-To-Action Link takes your website address. Dave has no website, so he leaves it empty. Nothing forces you to fill it in.
- Your VoiceThis one fills itself in. See below.
Under the boxes there is one more, Custom AI Instructions (Optional), described as The ultimate override. Give the AI specific rules for your brand. This is where you put your hard rules — words you never want used, a claim you must always make. Then click Save Persona at the bottom.
Your Voice: the part that happens by itself
The card at the bottom called Your Voice is not something you fill in. Once you have written three or more posts in your own words, the tool quietly reads them. It works out how you write — short sentences or long, emojis or none, how you sign off — and copies that from then on. When it has done so, the card shows an Active badge and a line like Learned from 7 of your posts · 05/08/2026.
Until then it tells you what it is waiting for: Write or save a few posts (3+) and the AI learns your style automatically — or tap Re-learn now. The Re-learn button is part of the paid version. Forget throws the learned style away. It only ever learns from posts you wrote — anything the AI drafted is left out on purpose, so it cannot end up copying itself.
Where it runs, and what it costs you
The writing does not happen on your computer. Your text is sent over the internet to the company's own small server — a server is a computer that belongs to them, not to you. That server asks a writing service to do the work and sends the answer back, and it takes a few seconds. If nothing has come back after 45 seconds it gives up and says AI request timed out. Please try again.
You get 5 free AI drafts. Not five a day — five in total, for as long as you have the extension. The grey counter under the buttons keeps track. If a draft fails or comes back empty, it is not counted against your five.
Be aware that one trip through Ideate costs two of the five, not one. Asking for the suggestions is one draft. Clicking Write it on the one you like is a second. Two sittings like that and you have one draft left.
These parts of the writing helper are free, within those five drafts:
These belong to the paid version:
When the free drafts run out you are not shown an error. The upgrade screen opens instead, headed You've used your 5 free AI drafts.
The rule that matters
Will it write in my language?
Yes. It reads what you typed and answers in the same language. If you write your instructions in Hungarian, the post comes back in Hungarian. Web addresses, business names, email addresses, phone numbers and @names are never translated.
Can it make a picture for my post?
No. It writes words only. Every photo and video has to be a file you upload yourself.
Nothing came back, or I got an error. Did I lose a free draft?
No. A draft is only counted once a finished result has actually reached you. If it fails, times out, or comes back empty, your count is untouched. A red message appears across the three buttons, in the little coloured box, for four seconds and then clears itself.
Do I have to use the AI at all?
No. Everything in this manual works with posts you typed yourself. The writing helper is a shortcut, not a step.
Running without you
Until now you have written a post and pressed a button to send it. This part takes your hand off the button. First you set a day and a time. Then you build a short chain of instructions that keeps going on its own, week after week.
Scheduling and automatic campaigns
When this stage is finished you will have one post booked for a day and time you chose, and one campaign that repeats without you.
The simple version: one post, one time
Dave wants his call-out notice to go into his fourteen Bristol groups every Monday and Thursday at midday. He writes it once and books it once.
- Write the post as usualOn the Create Post tab, pick your groups in box 1 and write your text in box 2. Nothing about that changes.
- Press Schedule for Later instead of Post NowAt the very bottom of the panel, next to a small eye-shaped preview icon, sit two buttons. Schedule for Later is the quiet one on the left; Post Now is the big blue one on the right. Click Schedule for Later. A window opens titled Schedule Your Post.
- Choose how oftenUnder Posting Frequency sit four buttons: ONCE, DAILY, WEEKLY, MONTHLY. ONCE is already chosen. Dave clicks WEEKLY.
- Pick the daysA row of seven day buttons appears under Select Days of Week. Dave clicks Mon and Thu. They stay pressed in.
- Set the timeType the time into the Time box, or tap one of the suggested times above it. Dave taps the one with the star.
- Save itClick Save Schedule. A message reads Your Quick Post has been added to the schedule. and the writing box empties. That empty box is how you know it worked: the post has moved out of the writing box and into your list of booked posts.
- Check the list of booked postsGo to the Activity tab and click Upcoming. Your post is sitting there with its time, a WEEKLY badge, and how many groups it goes to.
- How oftenFour choices, and each one asks you for something different underneath. ONCE asks for a date and a time. DAILY asks only for a time. WEEKLY asks which days of the week. MONTHLY gives you buttons for the 1st to the 31st.
- Suggested timesTap one and it writes that time into the Time box below, which flashes green. The one marked ⭐ Best is the strongest of that day.
- The days and the timeClick the days you want, set the time, then press Save Schedule at the bottom.
What time should you pick?
The Smart Timing Advisor is the small card with the star in it. It offers three or four times for whichever day you have chosen and marks one of them ⭐ Best. These are the built-in suggestions, and they are the same for everybody:
| Day | Times it suggests | Marked Best |
|---|---|---|
| Monday | 08:00, 12:00, 20:00 | 12:00 |
| Tuesday | 09:00, 12:00, 14:00, 20:00 | 12:00 |
| Wednesday | 09:00, 12:00, 14:00, 20:00 | 12:00 |
| Thursday | 09:00, 12:00, 14:00, 20:00 | 12:00 |
| Friday | 08:00, 12:00, 14:00 | 08:00 |
| Saturday | 10:00, 15:00, 20:00 | 10:00 |
| Sunday | 10:00, 15:00, 20:00 | 20:00 |
Underneath them is a switch called Post at my best times automatically, marked Pro. That one is about you rather than about people in general. Its own note reads We'll set the schedule time to when your posts get the best results.
It looks at the hour of day your own posts have actually landed at, and fills that hour in for you the next time you open the window to book something new. It leaves the time alone on a booking you are editing. It needs at least fifteen successful posts of your own before it has anything to go on. Below that it uses 12:00 rather than guess. So turn it on after a few weeks of use, not on your first day.
The night pause
Step 9 covered Avoid night posting: it is already on, and a run that is still going at ten at night parks itself and carries on at seven. Booked-in-advance posts obey it too, so nothing is lost if you set one for the small hours.
One thing is worth adding here. You will find that switch in two places, and they are two separate switches. One is on the Create Post tab, inside 3. Advanced Automation Settings. The other is inside every Post block of a campaign, under Configuration & Constraints, where the line underneath is worded slightly differently — Avoid posting 10PM - 7AM — but means the same thing and is switched on there too. Campaigns are the next thing on this page, so that second one will make sense in a minute.
Automations: a chain that repeats
A scheduled post is one notice at one time. An automation is a chain of instructions that runs top to bottom, like steps on a list, and can go round again. The tab is called Automations; a single chain is called a campaign.
Click Automations in the row of tabs along the top. The first time you do, a short explanation of two slides opens on top of the screen — read it and close it. Then click Create New.
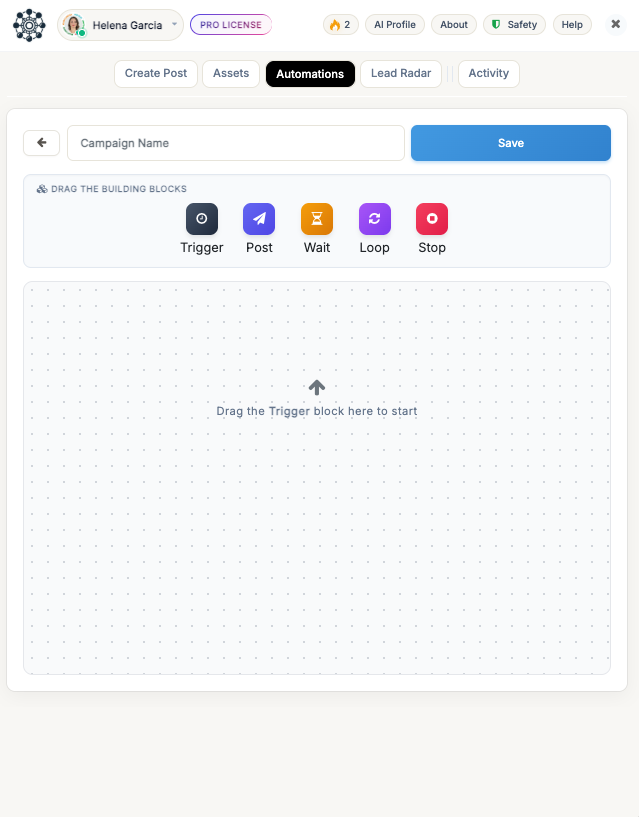
You can drag a tile down onto the dotted area with the mouse. You can also click a tile once and it drops onto the area by itself. Clicking does exactly the same thing and saves you the dragging. Here is what each of the five means.
Trigger
When to start. The only block that holds a day and a time. You get one and only one — once you have added it the tile goes grey with the note Only one Start Trigger allowed.
Post
What to send, and where. You choose one or more saved templates and one or more group collections, exactly as you do on the Create Post tab. A template is a post you wrote once and saved to use again.
Wait
Do nothing for a while. Three little boxes: days, hrs, mins. They all start at 0, so you must type a number into one of them.
Loop
Go back up and do it again. Either Forever, or Fixed Times with a count. It has to point at a step above it, never below.
Stop
Finish here. Its single line reads End the campaign here. Without it, a chain with a repeating Trigger waits and starts over next time round.
Or use a ready-made one
On the empty dotted area you first see START FROM A RECIPE and four cards. Three of them build a finished chain: Daily drip to my groups, 3-post launch over a week and Evergreen weekly loop. Tap one and the whole chain appears, already filled in with your groups and your first saved post. The fourth, Fill in my own, builds nothing — it just clears the cards out of the way.
Dave's campaign, block by block
Dave wants four weeks of cover and no thinking: his call-out notice on Monday, his bathroom-fitting notice on Thursday, four rounds of that, then finished. He clicks Create New, then Fill in my own to clear the recipe cards away, and taps the tiles in this order.
- Tap the Trigger tileA numbered card 1 appears on the dotted area with a grey badge reading Not configured. Click Schedule inside the card. The same Schedule Your Post window from earlier opens. He picks WEEKLY, ticks Mon, sets 12:00, and clicks Save Schedule. The badge turns blue and now reads Weekly (1 days) @ 12:00.
- Tap the Post tileCard 2 appears under it. Under Post Templates he picks his call-out notice. Under Group Collection he picks Bristol Local, his one folder of fourteen groups. The small grey line under the card title changes to 1 Post(s), 14 Group(s).
- Tap the Wait tileCard 3. He types 3 into the days box. That lands him on Thursday.
- Tap the Post tile againCard 4. Same fourteen groups, but this time his bathroom-fitting notice.
- Tap the Wait tile againCard 5. He types 4 into the days box, which carries him round to the following Monday.
- Tap the Loop tileCard 6. Under Repeat: he chooses Fixed Times and types 4 into the count box. Under Go to Step he chooses Step 2, the first Post card. Four times means the whole block of steps runs four times altogether — not four extra times.
- Tap the Stop tileCard 7. After the fourth round the campaign ends cleanly instead of drifting on.
- Name it and start itHe types Bristol autumn into the Campaign Name box at the top. Then he clicks the blue Launch button. A small window opens, headed Schedule campaign, asking Next runs Mon 12:00. Save this campaign? He clicks Schedule. He lands back on the list of campaigns with a green message: Your campaign is scheduled — next runs Mon 12:00.
Before pressing Launch, he reads the card underneath the chain. It is called Timeline preview. It reads the whole campaign back to you in one plain sentence, then lists the steps. If that sentence is not what you meant, fix it now rather than after fourteen groups have seen it.
- Name it, then start itThe arrow on the left goes back to the list without starting anything. The blue button reads Launch on a new campaign and Update when you are changing one you already have.
- The chainNumbered cards running top to bottom. Each one carries a small grey line telling you what it is set to, so you can read the whole campaign without opening every card. A card also has a small arrow that folds it away, and an ✕ that removes it.
- The plain-English checkOne sentence for the whole campaign, then the steps written out. If a Loop is set to Forever, a second short sentence is added on the end: Loops forever.
Which wording goes to which group
This only matters when one Post block holds more than one saved template. Then the panel has to decide which group gets which wording, and it asks you. The control sits inside the Post block, under the heading Posting Order, and it only appears once that block holds two templates or more — with a single template there is nothing to decide, so it stays hidden. It has two settings, and the two names are close enough to be confusing — so read the grey line underneath them rather than the names themselves.
- The two settingsAlternate sends one post per group and shares the wordings out between them. Sequential sends every wording to every group. A new Post block arrives set to Sequential.
Say Dave puts both of his notices into one Post block aimed at his fourteen groups:
| Setting | What each group gets | Posts sent |
|---|---|---|
| Alternate | Group 1 the call-out notice, group 2 the bathroom notice, group 3 the call-out notice, and so on down the list. One post per group. The same group gets the same notice on every run — this does not shuffle. | 14 |
| Sequential | Every group gets the call-out notice, and then every group gets the bathroom notice as well. Two posts into each group. | 28 |
Neither setting shuffles between runs. If you want a group to see a different notice each week, that is the Rotate templates each run tick box from step 11 — and it lives on the single-post route, not in campaigns. It belongs to the Schedule for Later route out of the Create Post tab, and it only appears there when Posting Frequency is set to something other than ONCE, and when you are not already sending everything to everyone. Open the same window from a campaign's Trigger and the tick box is not part of what gets saved: a campaign keeps the same split on every round.
Changing, pausing and stopping
Each campaign you have built is one row on the Automations list. The row carries a coloured tag reading Active, Paused, Completed or Error, a note of how far along it is, and when it next runs. The controls sit on the right-hand end of the row.
- The small arrow, labelled Timeline. Opens the step list inside the row, so you can see which step it has reached.
- Pause. The row flips to Paused. If it happens to be posting at that moment, the run in progress stops as well. Any waiting time still to go is remembered, so resuming carries on from the same place.
- Resume, the play button. One thing to expect: if that campaign had already finished, a message says Restarting and Campaign was finished, so it has been restarted from Step 1. It begins again rather than continuing.
- The pencil. Reopens the builder with every block as you left it. The blue button now reads Update instead of Launch.
- The bin icon. Asks Delete Strategy and Are you sure? This will permanently remove this campaign and its history. There is no undoing that one.
Single scheduled posts live somewhere else — Activity, then Upcoming. Each card there has three round buttons: run it now, edit it, delete it. Running one now does not cancel its future runs; the confirmation says so. Campaigns appear in that same list but deliberately have no buttons at all. They are there to be looked at; you control them from Automations.
On the free plan, and when the day's posts run out
Automations are a paid feature, and the panel is straight about it. On the free plan a banner sits at the top of the list: Automations are a Pro feature — build and save everything now; it all launches the moment you upgrade. Everything you build really is saved. Nothing goes out until you upgrade.
Say a campaign is running without a verified licence, and the day's allowance of group-posts is used up. It does not fail, and it does not keep trying over and over. It pauses itself. The row then shows Paused with a red line reading Trial limit reached. Please upgrade to continue.
A single scheduled post in the same position is left in the list of booked posts and tried again on a later minute. The counter pill in the top bar of the panel shows how many group-posts you have left today.
The computer was off at midday. What happened to my post?
Nothing was sent, and nothing was lost. A repeating post is noted as missed and goes at its next scheduled time by itself. A one-off waits for you under Action Required: Missed Posts, with three buttons: Post Now, Reschedule and Delete. It waits because only you know whether yesterday's offer is still worth sending.
How do I know it is actually working?
Open the panel and look at the thin coloured strip directly under the header. When there is work booked, it tells you how many automations are scheduled and running in the background. When a run is less than half an hour away, it changes to tell you roughly what time the next post goes out.
For the full picture, go to Activity, then Upcoming. That screen offers three views: a plain list, a month calendar with dots on the busy days, and a day-by-day timeline. The timeline has a red line marking the current hour.
Can the panel plan the week for me?
There is a button called Plan my week at the top of both the Automations screen and the Scheduled Posts screen. It writes seven short posts for the next seven days and shows them to you in a list, with a Preview on each row. You untick any you do not want before it books them. They are booked as ordinary one-off scheduled posts, so you can edit or delete any of them afterwards.
After the post: comments and replies
When this stage is finished, your posts will add their own first comment without you being there. The extension will also be watching your groups for the people asking for exactly what you sell.
Part one — the first comment
A first comment is a comment you leave on your own post, seconds after it goes up. Most people use it for one thing: the link. The post itself says what you do; the address of your website or your booking form goes in the comment underneath.
The extension tells you so itself. The quality panel is the box that scores your post as you write it. When your post contains a web address, it prints the line Contains a link. Tip: Placing links in the 'Auto-Comment' instead can double your reach. That is the reason people do it. Facebook does not publish how it decides who sees what, so treat the extra reach as a widely-used practice, not a promise.
The extension can write the comment for you, on every group, without you being there.
Setting it up
- Open the writing screenClick the Create Post tab along the top of the panel.
- Open the extra settingsScroll to the bottom of that tab and click the grey row marked 3. Advanced Automation Settings. It opens downwards, like a drawer, and more settings appear underneath.
- Find Comment SettingsScroll down inside that drawer to the heading Comment Settings. Underneath it are two cards side by side.
- Choose the second cardThe extension starts on the first card, Enable Comments, which adds no comment of your own. Click the second card, Add First Comment. A new box appears underneath the two cards.
- Type the commentThe new box is headed Auto-Comment Content. Type your comment into it. For Dave the plumber, that is his phone number and his booking page.
- The two cardsEnable Comments is the one it starts on. Click Add First Comment instead. Only then does the writing box below exist.
- Add spintaxThis one opens the same window as Add variations does on the post itself, in step 10. Select a few words in the comment, click it, and you can give two or three ways of saying them. Use it here too — see the warning below.
- The comment boxThe faint grey words inside it are not real text. They are a hint, and they disappear as soon as you type. And yes, the word "SPINTAXT" is spelled wrong on that hint. It is spelled wrong in the real product too. Nothing is broken.
Here is Dave's comment. He has given three ways of opening it, so no two groups get an identical one:
The delay — and the box that does not exist
A comment that appears in the same second as the post is the clearest possible sign that a machine did it. So the extension waits before commenting. In Speed Mode, the setting it starts on, the wait is a random gap of between fifteen and forty-five seconds after the post lands. It is different every time.
The other setting, Classic Mode, is the slower one that drives Facebook on the screen in front of you. On that setting the comment goes in as soon as the post is confirmed.
You cannot change that gap. There is no box for it anywhere, so do not go hunting for one.
Two more things worth knowing. On the Confirm Posting Details screen, the right-hand card has a row reading Auto-Comment:, followed by Active or Off. That row is your check that you really did switch it on.
And if the comment fails on one group, the post itself stays up. You have lost the comment on that group, nothing more.
Part two — Lead Radar: the people asking for what you sell
Lead Radar is the fourth tab along the top. It does something completely different from posting. You give it some words to look for, and a list of your groups to watch. From then on it looks at those groups every so often, on its own, without you being there. Every time somebody writes a post containing one of your words, it keeps that post for you.
A "lead", here, means one of those saved posts — somebody who has publicly said they want something.
For Dave, that is the difference between advertising twice a week and being the first name under "can anyone recommend a plumber, my kitchen tap is flooding".
Setting up Lead Radar
- Open the tabClick Lead Radar along the top. The first time only, a short box appears explaining what the tab does. Press Got it to close it.
- Choose your wordsIn Trigger Keywords, type the phrases people actually use when they need you, separated by commas. The grey hint under the box reads (Use -word to exclude. E.g., need help, -free). A word with a minus sign in front of it means "and not this". Dave types: plumber, blocked drain, boiler, leaking, -jobs. The last one keeps out posts about plumbing vacancies.
- Choose the groups to watchClick Target Groups, search, and tick the ones worth watching. The label beside it says (Max 25 - Recommended: 5-10), and 25 is a hard limit. Tick a twenty-sixth and a box appears saying You can monitor a maximum of 25 groups simultaneously to keep your account safe. Dave ticks his four "can anyone recommend" groups and his five neighbourhood ones.
- Leave the interval aloneScan Interval starts set to Every 15 Minutes (Balanced). The other choices are every 5, 30 or 60 minutes. Fifteen is the sensible one.
- Save, then switch it onClick Save Settings at the bottom right. Then click the rounded on/off button at the top right of the tab. On a paid licence it changes from a grey Click to activate to a green, gently pulsing Scanning Active. That green button is the only proof it is running.
- Try it once by handClick Manual Scan, at the bottom left. It searches straight away, instead of waiting for the next scan.
- The on/off buttonGrey, with the words Click to activate, means it is off. Click it. Green and gently pulsing, with the words Scanning Active, means it is on.
- Trigger KeywordsOrdinary words, separated by commas. A minus sign in front means "ignore posts with this word in".
- Target GroupsTwenty-five at the most. Pick the groups where people ask for help, not the ones where people sell sofas.
- Scan IntervalHow often it looks. Leave it on fifteen minutes.
How you find out something landed
Three things happen at once, and you do not have to have the extension open for any of them:
- A small red number appears on the extension's button in the Chrome toolbar — how many leads you have not read yet. Opening the Lead Radar tab clears it.
- Your computer shows a notification headed New Leads Found! 🎯.
- A small white card slides up in the bottom-right corner of whatever web page you are on. It reads Group Monitoring and Captured 2 new leads matching your keywords. Click to view. It goes away by itself after ten seconds.
Reading a lead and replying
The bottom half of the tab is split in two. The list of leads is on the left; whichever one you click is shown in full on the right.
- The listEach row is one person who used one of your words. The tag on the right says New, Seen or Replied, so you can see at a glance what you have dealt with. The star on a row keeps a lead you want to come back to. The extension keeps your hundred most recent leads.
- The three buttonsCopy Link copies the address of that post. View Post opens it on Facebook so you can reply there yourself. AI Draft Reply writes a suggested comment for you.
AI Draft Reply opens a box headed AI Magic Reply with the line Review the AI drafted reply. You can edit the text before posting. The draft sits in a box you can type in, so you can change every word of it. Then you have two buttons. Auto-Post Reply posts it as your comment. Copy & Open copies it and opens the post on Facebook, so you can paste it in yourself.
Be honest about what wins the job. Speed is most of it — the person with the flooding kitchen rings the first plumber who answers, not the best one. But a reply that reads like it came out of a machine loses to a neighbour who wrote two sentences.
So use the draft as a starting point and put your own words in it. Mention the street, or the problem they actually described. Reply within the hour. That is the whole trick.
Things about Lead Radar that surprise people
- A lead can turn up one scan late. Each scan looks at your groups in a slightly different way from the one before, so two scans genuinely see different things.
- A minus word on its own catches everything. If the only thing you type is -free, you will be given every post that does not contain the word "free". Always have at least one ordinary word in the box.
- An empty inbox is not a fault. The screen will say Inbox Zero with the line No new keyword matches yet — we'll keep watching. If it says Add keywords and groups, then turn on the radar to start finding leads. instead, you have not finished the setup.
- You can take the leads with you. Export, in the row of controls above the lead list, downloads them as a spreadsheet file. It carries the date, the author, the group, the words that matched and a link to the post. Clear All, the red button beside it, empties the list.
Can I set how long the first comment waits?
No — there is no box for it. In Speed Mode, the one it starts on, the extension waits a random fifteen to forty-five seconds after the post lands. That is deliberate: a comment appearing in the same second as the post is an obvious sign of automation. Classic Mode comments as soon as the post is confirmed. The only delay you set yourself is Wait Time, in minutes, and that is the pause the run takes between groups.
Do I have to pay for Lead Radar?
The scanning only runs on a paid licence. On the free plan the screen is fully visible and your settings save. But the on/off button will not turn green: clicking it, or Manual Scan, opens the page asking you to upgrade. So nothing is ever collected, and any leads shown are blurred behind Hidden Lead and Premium Group.
Posting as a Page, and running more than one account
When this stage is finished you will be able to send a post out under your business name instead of your own. You will know why your groups look like they have vanished, and the one habit that stops a Page run going wrong halfway through.
What "posting as a Page" means
Think of Facebook as a shop counter. You have your own name badge. If you also run a business Page, you have a second badge with the business name on it. A Page is a separate Facebook profile in the name of a shop, a trade or a practice. Facebook lets you pin on either badge.
Whichever badge is pinned on at that moment decides three things: whose name goes on the post, whose photo appears beside it, and who people are replying to. This manual calls each badge an identity — either your own profile, or one of your Pages.
Facebook keeps a note of which badge you are wearing, inside your own browser. The extension can read that note and can change it. That is all "posting as a Page" is.
The extension follows that badge closely. Before every single post in a run it puts the right badge on, then checks that it went on. If it cannot, it skips that one group rather than let the post go out under your own name by accident.
Before you switch: the one thing Facebook needs
You must be logged in to Facebook, in this browser, as the account that runs the Page. That is the whole requirement. You do not have to find Facebook's own "switch to your Page" menu first — the extension pins the badge for you.
There are two moments when you do have to go into Facebook yourself, and the extension will tell you clearly when they arrive. One is when you want to pull in the groups the Page itself has joined. The other is if a switch fails. It says so plainly rather than pretending: Couldn't switch profile. Open Facebook, make sure you're logged in, and try again.
Switching, in the panel
- Find your nameLook at the top-left of the panel: your Facebook photo, your name, and a small downward arrow.
- Click itThe whole strip — photo, name and arrow — is one button. A small list drops down headed Post as. The first time you open it there is a short pause while it asks Facebook which Pages you run.
- Read the listYour own name is there with a green tag reading Personal. Under it is one row for each Page you run, each with a blue tag reading Page.
- If your Page is missingClick Refresh profiles at the bottom of the list. If you genuinely run no Pages, a box appears: No Pages found / You don't manage any Facebook Pages, so you can only post as yourself. Posting will stay on your personal profile.
- Click the Page rowThe list closes and the name at the top changes to the Page. On the Create Post tab, the small card at the very top now reads Posting as, with the Page's name and a blue tag reading Page. It also grows a blue stripe down its left edge. That card is a sign, not a switch — there is no button on it. Switching only ever happens from the badge at the top.
- Your name at the topPhoto, name, small arrow. Click anywhere on it. Once you are past the first-time setup, this is the only place you change badge.
- A Page rowClick it and the badge changes. If a posting run is going on right now, it refuses instead, and says Finish or stop the current posting run before switching profiles. A run that started under one badge must finish under that badge.
- Refresh profilesAsks Facebook again. Use it if a Page you know you run is not in the list.
The big surprise: your groups look like they have gone
Switch to a Page, open the Assets tab, and the group list is empty. Every collection you built, gone. This is the moment people email support.
Nothing has been lost. Each badge keeps its own address book, on purpose. Your own profile is in one set of groups. The business Page is in a different set — very often none at all to begin with. Your tags (the names you file groups under) and your collections belong to the badge you made them with. They are all still sitting under your own name, exactly where you left them.
The screen says as much. It reads Nothing saved here yet, with the line This Page has no groups of its own yet. Your other groups are still saved — copy them here, or extract this Page's groups from Facebook.
- Use my existing groups hereMakes a copy of your existing collections and files the copy under the Page. Your own lists are untouched — nothing is moved and nothing is deleted. A green message confirms it: Your groups are now available on this Page. Pressing it twice does not create duplicates.
- Add your Facebook groupsGoes and reads the groups the Page itself has joined, which is a different list. For this one, Facebook really does have to be acting as that Page. If it is not, you get told exactly what to do: Facebook isn't acting as this Page right now. Open Facebook, switch to the Page (top-right menu), close other Facebook tabs, then try again.
Your saved posts are treated differently from your groups. The templates you wrote under your own name stay visible when you switch to a Page, because they are your shared writing library. Only a template you create while a Page is active belongs to that Page alone.
To copy things across on purpose:
- Open your saved postsGo to the Assets tab and pick Post Templates.
- Start the copyClick Import from profile. A box opens headed Import collections & templates.
- Pick what comes overChoose a source under Copy from, tick what you want, then click Import selected.
The real hazard: other Facebook tabs
This is the one thing that goes wrong, and it is worth reading twice. Facebook's own software can quietly swap your badge back to your own name. It does that from another Facebook tab you have left open, while the extension is halfway through a run.
The rule: before you start a run as a Page, close every other Facebook tab, and do not open Facebook again until the run has finished. One tab, or none. The extension's own one-time reminder says the same thing: Posting as a Page / Tip: close your other Facebook tabs while posting as a Page — they can reset your Page session mid-run. Where it says "Page session", it means the note Facebook keeps of which badge you are wearing.
You can check all of this before you start. Click Safety at the top of the panel, then Run diagnostic at the bottom of that screen. Under Diagnostic results it tells you plainly which badge is really on: Posting as your Page: Whitlock Plumbing & Heating. It also counts your open Facebook windows for you: You have 3 Facebook tabs open — close the extras before a Page run so your Page session isn't reset.
One more line you may see during a run is not an error. Say Facebook is genuinely acting as your Page, while the extension was set to your own name. A run you started by hand will then say Facebook is set to post as your Page — posting as that Page. and go out as the Page. It tells you, instead of quietly doing something other than what the screen shows.
Groups that refuse Pages — not a fault
Plenty of local and community groups do not accept posts from business Pages at all. That is the group admin's own house rule. It produces the failure line you are most likely to meet on a Page run, and it spells out the remedy: No permission to post in this group (Facebook: Insufficient permission). If you're posting as a Page, this group may not allow Page posts — try your personal profile, or ask the group admin to enable posting by Pages.
The extension remembers. It leaves a group out of future Page runs for sixty days, once that group has refused that Page twice. Twice, not once — a one-off hiccup does not count. It says so on the confirmation screen before you send.
- The two linksInclude them anyway puts those groups back into this run, if you think the group has changed its rules. Stop skipping these wipes the memory entirely. Up to five names are listed, then a "+N more" line, where N is how many are left.
- Post NowSends the run without the skipped groups. The sensible answer is to leave them skipped and post to those groups under your own name in a separate run.
Sofia, an estate agent, uses this deliberately: two collections and two badges. Her nine property groups get the listing, posted as her Page, where a business name carries weight. Her twelve neighbourhood groups get a softer post about the open house, posted under her own name. That is what those groups accept. Test a group once by hand before you add it to a Page's collection.
More than one Facebook account: one client, one Chrome profile
Two different things get mixed up here. Work out which one you need before you start.
✓Several Pages, one Facebook login
- You run four business Pages from your own Facebook account.
- Nothing special is needed. Use the Post as list to hop between them all day.
- Each keeps its own groups, its own tags, and its own booked-in-advance posts.
✕Genuinely separate Facebook accounts
- You are handling clients who each have their own Facebook login.
- The extension cannot juggle two Facebook logins at once. It works with the one account signed in to this browser.
- Give each client their own Chrome profile — Chrome's own way of keeping separate browsers on one computer — and sign that profile in to that client's Facebook.
There is a cost to that second arrangement, and you should know it before you build a business on it. A licence counts each Chrome profile as a separate device. The extension says so itself when you run out: Each Chrome profile counts as its own device. Still stuck? Email [email protected] and we'll free one up for you.
How many devices a licence allows is decided where the licence was sold, not by the extension. Check what your own plan says. If you are setting up your fifth client and the licence will not activate on that profile, that is why. The message tells you the address to write to.
I switched to my Page and all my groups disappeared. Have I lost them?
No. Each identity keeps its own group list. Yours are still filed under your own name. On the Page's empty screen, click Use my existing groups here to make a copy for the Page. Nothing is moved and nothing is deleted.
Can I change from my Page to my own name in the middle of a run?
No, and it will refuse: Finish or stop the current posting run before switching profiles. A run that started as one identity has to finish as that identity. Let it end, or press Stop Posting, then switch.
Keeping it running
Two things are left. The first is what you get for nothing and what you get for money, counted the way the extension counts it. Then the number on your screen stops being a mystery. The second is what to do on the day something goes wrong. For that you get a screen that checks the extension for you, a file that saves your work, and an email address a person reads.
Free, trial and Pro
When you finish this stage you will know exactly what the free plan allows, what happens the moment you run out, and how to switch a paid licence on.
The unit is a group-post, not a post
This is the part that is most often misread, so here it is plainly. The free plan gives you 5 group-posts a day. A group-post is one post delivered into one group. It is a delivery, not a piece of writing.
So if Dave the plumber writes one advert and sends it to 5 groups, that is 5 group-posts, not 1. His whole day is spent. Dave has 14 groups saved, so on the free plan he cannot reach all of them in a single day.
| What you do | Group-posts used | Left of today's 5 |
|---|---|---|
| One post into one group | 1 | 4 |
| One post into 5 groups | 5 | 0 — the day is spent |
| One post into all 14 of Dave's groups | 14 | Will not fit |
| Two saved posts, each into 5 groups | 10 | Will not fit |
At midnight where you live, the count goes back to 5. Not part of 5 — the whole 5, every day, for as long as you keep the extension. The free plan never expires, and it never asks for a card.
Where the number lives
The number sits in the top bar of the panel, next to your name. It changes as you post.
- Your counterThe small blue oval sits next to your name. It reads Free: and two numbers: what is left today, then the day's allowance. When nothing is left it turns red, and resting your mouse on it shows You've used today's group-posts. Upgrade to keep posting. On that day the Upgrade button beside it changes to read Unlock all 14.
- The reminder lineOn the Create Post tab, free users see one line that repeats the daily limit and says how many groups they have saved. You do not see this line if you have saved fewer groups than one day allows.
A brand-new install gets more on its first runs
On a fresh install the oval may read 5 uncapped instead. That is a separate, one-time allowance: your first 5 runs, one run per day, may each go to up to 30 groups without touching the daily 5. (A run is one press of Post Now, working through the groups you picked.) Dave's 14 groups fit inside that, so his first run reaches all 14 for nothing. After those 5 runs, the oval switches to the ordinary Free: 5/5 counting.
When you pick more than you have left
Nothing is sent. The extension stops before the first post goes out and shows you the sum. It never quietly posts to some groups and hides the rest.
- Let it decidePost to my best 5 sends to the 5 groups your posts have done best in. The small print says it ranks them on your results from the last 60 days. Before you have posted anything there are no results, so it takes them in list order.
- Lift the limitUnlock all 14 with Pro opens the upgrade screens. Nothing is charged here.
- Choose yourselfLet me choose opens the group picker again. A message there tells you how many to untick — for example Keep 5 of 14 — remove 9 to post today.
When the day is spent
When one is left, a small message says 1 group-post left today — choose where it goes. When none is left, pressing Post Now does not start a run. You see this window instead.
- What paying removesThis grey card is the extension's own list, word for word. The daily limit goes, and four things the free plan will not run for you start running.
- Waiting is a real answerI'll wait until tomorrow closes the window. Your allowance comes back in full at midnight where you live. Nothing is lost by choosing it.
What it costs
To reach that screen, click Upgrade in the top bar of the panel. A window opens headed Unlock Unlimited Power. In it are three cards side by side: Monthly on the left, a highlighted Yearly in the middle, and Quarterly last. Each card shows its price and a Choose button. Longer terms cost less per month.
At the foot it says Secure payment via LemonSqueezy. LemonSqueezy is the company that takes the payment. Pressing Choose does not charge you. It opens a payment page in a new browser tab.
The short trial, when it is offered
There is a six-day trial that unlocks Pro for one small charge today. It is not on that window of three price cards. It sits on a different screen. You reach that screen by pressing an Unlock all 14 button. One of those sits on the Create Post reminder line. Another, labelled Unlock all 14 with Pro, appears in the message you get when you pick more groups than you have left.
On that screen, press See how the trial works. If the trial is running you then arrive at a button carrying a yellow ribbon reading Best way to start. The button itself names the length and the amount, and a line under it names what starts afterwards. Read both on your own screen — those are the only numbers that are yours. If the trial is not being offered, that button is replaced by Unlock every group — without trial, which takes you to the ordinary plans instead.
Above the trial button, three lines spell out what happens:
| When | What happens |
|---|---|
| Today | The small charge is taken, and full Pro unlocks right away — every group you've saved, on every run. |
| In 6 days | The monthly price starts. Nothing is charged between now and then. The screen names the exact amount — read it there. |
| Anytime | Cancel during those 6 days and the monthly price never starts. |
That screen also carries a Compare all plans link. It opens the window of three price cards described above, so you can go either way.
Once that first payment goes through, the payment company sends you a licence key, exactly as it does for any other purchase. You switch Pro on with it in the same way, and the steps are below. While a trial is running, the oval in the top bar reads TRIAL with the days left beside it.
Switching a paid licence on
Paying does not unlock anything by itself. The payment company emails you a licence key — a long code with dashes in it. You copy that code and paste it into the extension. That last step is the one people most often forget.
- Find the keyOpen the email receipt from LemonSqueezy and copy the licence key. After paying, your browser also lands on a page at groupposting.com/success/ showing the same key in a big box with a Copy button.
- Open the panelClick the extension's icon at the top of Chrome. For 48 hours after you click through to the payment page, a white banner waits at the top of the panel: Just checked out? Your license key is in your email receipt — paste it here to unlock Pro. Click Activate now on that banner.
- Or get there another wayClick Upgrade. Look for the words Already purchased? beside the button Activate License Key, and click that button. The pair sits at the top of the upgrade window and again at the bottom. The same button also appears on the About screen while your licence is not yet activated.
- Paste and pressPaste the key into the one box on the screen, then press Activate License.
- The boxThe faint grey XXXX-XXXX-XXXX-XXXX is not your key — it shows the shape a key has. Paste your own code over it, with no blank space before or after it.
- The buttonIt changes to Verifying... while it checks, then to Success!
- Leaving without a keyContinue with Free Trial (Close this window) closes the screen and leaves you on the free plan. Nothing is broken by pressing it.
What success looks like. A green message says Pro unlocked — welcome aboard! 🎉. The screen closes itself after a second. Then a window appears headed Welcome to Pro, reading License activated successfully! All features are now unlocked. The oval in the top bar changes from Free: 5/5 to PRO LICENSE.
The extension also looks for an online backup saved under that key. If it finds one, it asks before touching anything. The window is headed Welcome Back! and shows the date of the backup, with two buttons: Restore My Data and No, start fresh.
The two things that really go wrong
1. Your subscription renewed and now it says the key is invalid
This is not a fault and you have not been charged twice. When a subscription renews, the payment company issues a brand-new key and the old one stops working. What you see is a window headed License Issue reading Your license key is invalid or has expired. Please check your key or purchase a new one.
The fix: open the newest email from LemonSqueezy and copy the key out of it. Paste it in through Activate License Key, exactly as you did the first time. It works again straight away.
2. It says the licence is in use on your other devices
A key covers a limited number of machines. When you pass that number you get a window with this exact text:
Your licence is already active on the maximum number of devices. Open Group Posting Pro on a device you no longer use, go to About → Remove Validation Key, then activate here again.
Each Chrome profile counts as its own device. Still stuck? Email [email protected] and we'll free one up for you.
The fix, in order. Go to the computer you no longer use and open the panel there. Click About, then press the red Remove Validation Key. You will see Validation key removed, and that machine drops back to the free plan with its slot released. Now go to the new machine and activate the same key.
Do I need an account or a card to use the free plan?
No. There is nothing to sign up for and no password to invent. The free plan needs no card. Pro is unlocked by pasting a key that arrives by email.
It says my key is wrong, but I copied it correctly.
The window headed Activation failed carries a tip: the key is in your LemonSqueezy receipt email, and must be pasted exactly, with no spaces. Nine times out of ten it is a stray space at one end, or the code was typed by hand instead of copied. Copy it again straight from the email.
If instead the message says the server could not be reached, it also tells you your key may still be valid. Check your internet connection and press the button again.
My card was declined. Have I lost access?
Not immediately. A banner appears saying your last payment didn't go through: Your card was declined. Update your payment method to keep Pro — you still have full access in the meantime. Two buttons follow, Update payment method and Remind me later.
I paid, but my run still stopped short.
Two possible causes. Either the key has not been entered yet — check the top bar reads PRO LICENSE and not Free:. Or Warm-up mode (new accounts) is switched on in the Safety screen, which deliberately limits a brand-new Facebook account for its first week. The run says so when that happens.
Where do I check which plan I am on?
Three places. The oval in the top bar. The About screen, where Status: reads Verified or Not Activated. Or the check-up in the next stage, which prints one line: Pro plan active — unlimited posting, or Free plan — 3 group-posts left today.
When something goes wrong
When you finish this stage you will have a saved copy of your work, a way to make the extension check itself, and the address to email.
Find your symptom
| What you see | Why | What to do |
|---|---|---|
| You click the extension's icon at the top of Chrome and the panel does not open, or opens blank. | The panel failed to start. | Close it and click the icon again. If you get Couldn't reach the extension, do what it says: close the window, open it again, and restart Chrome if it keeps happening. That message also says your licence key has not been used up. If a page appears headed ⚠ Group Posting Pro didn't load, select all its text, copy it, email it to [email protected], then press Try again. |
| The icon has disappeared from the top of Chrome. | It came unpinned, or Chrome switched the extension off. | Click the small jigsaw-puzzle picture at the top right of Chrome. If Group Posting Pro is in the list, click the pin next to it and the icon is back. If it is not listed, type chrome://extensions into the address bar and press Enter, find Group Posting Pro, and switch it back on. Your saved work is not affected by either. |
| You press Post Now and nothing happens. | Chrome had put the part that does the posting to sleep. | A window headed Engine Sleeping says The background engine was asleep. Please click 'Post Now' again to wake it up. Press Post Now a second time. This is normal, not a fault. |
| It says you are logged out. | Facebook has signed you out in this browser. | The run halts with the reason Facebook session/token expired. Please log in. A message may also pop up in the corner of your screen, headed GPP — Facebook session expired and reading Posting stopped. Log back into Facebook, then resume in GPP. Both mean you have been signed out. Open facebook.com in the same browser, log in, then run again. |
| Every single group failed. | Almost always: you are posting as a business Page, and those groups do not accept posts from Pages. | Click the small i beside a failed row and read the reason. Then use the name at the top of the panel to switch back to your personal profile, or ask the group's admin to allow Page posts. If the whole run stopped by itself, the reason tells you what to do: open Facebook, switch to your Page, close your other Facebook tabs, run again. |
| It stopped halfway through. | Chrome closed, the computer slept, or you pressed Stop Posting. | Everything runs inside your own Chrome, so if Chrome stops, the run stops. Do not re-run the whole list. Open the last run's results, note which groups already say Success, untick those, and send the rest. |
| Facebook changed and it cannot find the buttons. | Facebook keeps changing how its own pages are built. | The extension fetches fresh instructions from its maker's server and repairs itself. You do not have to update anything. The check-up says so: Facebook changed something recently — the app is auto-updating itself. If posts fail, wait a few minutes and retry. Waiting really is the answer here. |
| It seems frozen or asleep during a run. | Chrome pauses work that happens in the background, to save power. | Open the panel. If it says Waking up background engine..., it is coming back on its own — leave it. If it is genuinely stuck, scroll to the bottom of the posting screen and press Force Reset Engine. It warns you that it will stop anything running and clear temporary data. Answer Yes, Force Reset. The panel closes itself. Open it again and you are back to normal, with your saved posts and groups untouched. |
Make it check itself
Before you email anyone, spend ten seconds on the built-in check-up. It looks at your Facebook connection, which account you are posting as, your plan, and whether the part that does the posting is up to date.
- Open the Safety screenClick Safety in the top bar of the panel.
- Scroll to the bottomClick Run diagnostic. It shows Running checks…, then a short report headed Diagnostic results appears on the same screen.
- Some lines fix themselvesSome jobs the extension can do for you. When that is so, a small button sits at the right of the line: Open Facebook, Enter license key, or Re-extract groups. Press it and it does that one thing.
- The other button is for support, not for youCopy diagnostic copies a short report so you can paste it into an email. The button briefly reads Copied! to tell you it worked. The report lists your version, whether Facebook is connected, and how the last run went. It contains none of your post wording and none of your group names — the only address in it is the link to your last post.
Read the marks like this. A green tick means that part is fine. An amber triangle means that part needs your attention. A grey i means the extension could not check that part, often because the browser would not let it read something. That is information, not a fault.
At the foot you get either Everything looks good — you're ready to post. or a count of the items that need you.
Save a copy of your work — today, not later
- Open AboutClick About in the top bar of the panel, then scroll down to Backup & Restore.
- Press the buttonClick Backup All Data. A file is saved into your Downloads folder. Its name looks like groupposting_backup_2026-08-08.json.
- Check it workedA window headed Backup Successful says Your Post Templates and Group Collections have been saved to a file. If you have saved nothing yet, it says There is no data to back up. instead.
- Put it somewhere safeEmail the file to yourself, or copy it onto a memory stick. Either is enough.
- Your version numberTop right of this card. Quote it when you email support.
- Your Support IDAn anonymous code that lets a human find your reports. It is not your licence key and gives nobody access to anything.
- The two backup buttonsLeft saves a file onto this computer. Right reads a file back in.
- Not a repair buttonRemove Validation Key drops you back to the free plan on purpose. Press it only when moving to another computer, or before you uninstall.
Putting it back, here or on a new computer
Install the extension on the new machine, click About, then Restore from Backup, and choose your file. It asks before it changes anything, and names the numbers: This will add 12 post templates and 4 group collections to your existing data. Are you sure you want to continue? Say yes, and you get Successfully added 12 new templates and 4 new collections.
Pro has a second way to do this. The extension keeps its own copy online, about once a day. On the new machine, activate your licence key. It may offer that copy straight away, in a window headed Welcome Back! that names the date. The two buttons are Restore My Data and No, start fresh.
You can also do it by hand. On the About screen, press Save to Cloud to send a copy up, or Load from Cloud to bring one back. Those two are Pro only — on the free plan they show an upgrade offer instead of saving anything.
The online copy is lighter than the file. Its own note says media is left out to keep it small. Keep your original pictures somewhere of your own, and take the file backup as well as the online one.
Updating, and which version you have
You do nothing. Chrome updates extensions from the Web Store by itself, in the background.
- This version shows nothing at all when it updates — no "what's new" page and no pop-up. Do not wait for one, and do not assume nothing has changed because you saw nothing.
- To read your version: click About. The top right of the card says GroupPosting PRO Version: and a number. It was 2.8.0 when this manual was written; yours may be higher.
- To make Chrome look for an update now: type chrome://extensions in the address bar and press Enter, switch on Developer mode, then press Update. That is a Chrome button, not one of ours.
Reading the panel in your own language
The panel does not have to be in English. On the same About screen, above the two switches, is a drop-down list of languages.
- Open the listClick About in the top bar, then click the language box. It starts on System Default, which means "whatever language Chrome itself is set to".
- Pick your languageEleven are offered besides English: German, Spanish, French, Italian, Portuguese, Polish, Hungarian, Indonesian, Filipino, Vietnamese and Hindi, each written in its own language.
- Reload when it asksA box appears headed Language Changed, reading Please reload the tab to apply the new language. Agree, and the panel comes back in the new language.
What it knows about you
It never sees your Facebook password. There is no password box anywhere in it, no sign-in of its own, nothing to register. It works the way you do: you are already logged into Facebook in this browser, and it uses that. The extension's own opening screen says so — It posts from your own Facebook session at human speed — no password sharing, no bots, no risky shortcuts. The only two things it reads from Facebook are the markers saying which account is logged in and which Page you are acting as.
✓Stays on your computer
- Your group collections and the group names in them.
- Your saved posts, and the pictures and videos you attached.
- Your campaigns and your posting history.
- Your licence key.
✕Leaves your computer
- The post itself, going to Facebook. That is the job.
- A short note when something breaks: a code word, the version, your browser version. No group names, no post words.
- A count after each run — how many posted, how many failed.
- Text you hand to the Generate or Improve button. That text has to leave your computer to be written.
- On Pro only: about once a day, a copy of your saved posts and your group list, stored so you can get them back. That copy includes the words of your posts and the names of your groups.
- Your licence key, when it is checked.
There is one switch, on the About screen: Allow Anonymous Usage Data, described as This helps us improve the extension. We never collect personal data or content. It starts switched on.
One more honest point. When you installed it, Chrome warned you it could "read and change your data on all websites". That is Chrome describing what it is allowed to do, not what it does. On any page that is not Facebook, the part that reads pages stops immediately.
What stays awake elsewhere is the piece that draws the panel when you click the icon. There is also a small "are you there?" answer it uses to find that piece. Neither of them reads the page you are on.
How to stop everything
- The red buttonOn the posting screen, press Stop Posting. You will see Sending stop signal..., then Posting Stopped by User. Every group it had not reached is recorded as Skipped.
- Know what "stop" meansIt stops before the next group. A post handed to Facebook a second earlier will still appear. That is not the extension ignoring you.
- Stop a repeating jobPause or delete a schedule or a campaign on its own screen. The red button does not stop those.
- Stop everything at onceQuit Chrome. Everything runs inside your browser, so closing Chrome stops all of it.
- Put it aside without losing itType chrome://extensions in the address bar and press Enter, find Group Posting Pro, and switch it off. Your saved work is untouched and comes back when you switch it on again.
Uninstalling cleanly
- Back up firstClick About, then Backup All Data. Removing the extension deletes what it kept on your computer, with no second chance and no warning from Chrome.
- Free your licence, if you paidClick About, then Remove Validation Key, so you can use the key on another computer later. Doing this after the extension is gone is much harder.
- Remove itRight-click the extension's icon at the top of Chrome, choose Remove from Chrome…, then confirm. chrome://extensions does the same job.
- A page will openChrome opens a page headed Group Posting has been removed, asking why you left. Reply or close it, as you like.
- If you were on ProThe online copy of your posts and groups stays on the maker's server. Email [email protected] and ask for it to be deleted.
Getting hold of a person
Click Help in the top bar. A window headed Help & Support gives both routes, word for word. For technical issues, please write to us at: [email protected]. Or visit our help page for guides and FAQs: groupposting.com/help.
Put three things in the email and you will usually get an answer without twenty questions coming back:
- The text from Copy diagnostic — click Safety, then scroll to the bottom of the screen.
- Your Support ID: from the About screen.
- One sentence on what you expected and what happened instead.
Do I lose my work if I switch the extension off for a while?
No. Switching off in chrome://extensions is not the same as removing it. Your groups, posts and history stay where they are and come back when you switch it on again. Only Remove from Chrome deletes them.
One group fails every single time. Can I clear those out?
Yes. Click Activity, then History, then press Health. It looks for groups in your collections that fail consistently. It offers them in a list headed Found 4 Dead Groups, with the note These groups are still in your collections but fail consistently. Tick the ones you agree with and press Remove Selected Groups.
Does it work on my phone?
No. It needs a desktop browser — Chrome or Edge on Windows, macOS, Linux or ChromeOS. There is no phone or tablet version.
Six real weeks, six real businesses
Six people, six trades, six complete set-ups you can copy from start to finish.
These are case notes, not adverts. Each one gives you the whole thing:
- the advert as they typed it;
- the same advert turned into spintax — a way of writing one post so it comes out slightly different every time;
- the collections of groups they aimed at;
- the three settings that matter;
- the scoreboard at the end, failures included.
Find the one closest to your business and copy it. Dave, the plumber, is the fullest.
1 · Dave the plumber — one advert, fourteen local groups
Dave is a sole-trader plumber. Twenty-two years on the tools, no website worth the name, no marketing at all. He sells 24/7 emergency call-outs — burst pipes, blocked drains, dead boilers — and bathroom fits when the diary goes quiet.
He is already in fourteen Facebook groups for his own city: four “can anyone recommend…” groups, five neighbourhood groups, three local buy-and-sell groups and two landlord groups. He joined them years ago and has never once posted in any of them.
What he wants this week
Two dead weekday mornings filled, and to be a name people already recognise before the first cold snap. One post into all fourteen groups on a Monday and a Thursday, forever, without him touching it.
The advert he wrote
He typed it into the big box on the Create Post tab, exactly the way he would say it out loud. No headings, no hashtags, no jargon.
The same advert as spintax
He highlights the words Blocked drain in the box, clicks the button that now reads Vary selected text (it says Add variations when nothing is highlighted), and types two other ways of saying it. He does that four times in total. He never types a curly bracket himself — the box that opens does that for him.
Four sets of brackets, three choices in each. 3 × 3 × 3 × 3 = 81 different versions of one advert. Every group gets its own version, picked at the moment it posts.
When he presses Post Now, a summary screen headed Confirm Posting Details appears before anything is sent. On it, his four sets of brackets earn the green tick Strong Post Spintax (4 blocks). Three or more sets is what it takes to get that tick.
Three of the eighty-one
This is what three different groups actually see. Same offer, same phone number, three different posts.
The groups he aims at
One collection, called Bristol Local, holding all fourteen groups. He made it on the Assets tab, once his group list had finished loading, using the button labelled Create New Tag. Then he ticked all fourteen groups, clicked Manage Tags on the bar that appeared, ticked the new tag and pressed Apply Tags. There is no dragging of groups anywhere in this screen.
He does not split them up. His service area is one place and the offer is the same for everybody in it. He deliberately keeps the four “can anyone recommend a plumber?” groups in the same collection. Those are the ones where his name needs to be familiar already.
His settings, and why
Most of these live behind 3. Advanced Automation Settings, the grey bar near the bottom of Create Post. The posting-order card sits directly above that bar, and only appears once you pick more than one template. He changed exactly one thing.
| Setting | His value | Comes set to | Why |
|---|---|---|---|
| Wait Time | 4 min | 2 min | He would rather it take an hour than look like a machine. The gap is varied slightly around his number on purpose, so it is never exactly four minutes twice. |
| Interval | 1 post | 1 post | Untouched. A full wait after every single post. |
| Pacing | Use my timing (safe minimum gap) | Same | Untouched. Fourteen posts is a small day, so this mode leaves his four minutes alone and only steps in if he ever sets the gap far too short. |
| Avoid night posting | On | On | Untouched. Nobody wants a plumbing advert at two in the morning, and posting between 10PM and 7AM is one of the clearest signs of a machine. |
| Posting Security Level | Balanced | Balanced | Untouched. |
| Posting order | Split (1 per group) | Same | He never sees this card — it only appears once two or more templates are picked. With one advert the run is fourteen posts either way, one to each group. |
That same summary screen gives him an estimated running time: roughly 55 to 70 minutes for the fourteen groups. He starts the run, minimises it, and goes out on a job.
What came back
This is the screen at the end. Nothing is hidden and nothing is rounded up.
- Posting completed!The badge counts three minutes for every post that landed. Eleven landed, so it reads 33 min. It does not count the ones that failed.
- The four numbersThey always add up: 11 + 2 + 1 = 14. Amber Unconfirmed only appears when there is at least one.
- The amber warningOne post could not be confirmed. That usually means it went up but an admin has to approve it first.
- Retry offers 2, not 3It deliberately leaves the amber one alone, because retrying a post that already landed would post it twice.
The two that did not land are worth reading properly.
- Bedminster Community Notice Board — red. The reason reads “No permission to post in this group (Facebook: Insufficient permission)”. That group only lets its admins post. There is nothing Dave or the extension can do about it. He takes that group out of his Bristol Local collection.
- BS3 Buy & Sell — grey. “You're not a member of this group, so the post was rejected. Join the group first, then retry.” He left that group two years ago and forgot.
- Southville Residents — amber. That group holds new posts for an admin to approve. He clicks the group name, has a look, and leaves it alone.
Making it repeat
Later that week he upgrades and builds one automation so he never opens the extension again.
- Open the builderGo to Automations, click Create New, then Fill in my own. You get an empty grid.
- Say whenClick the Trigger tile, then click Schedule inside it. Choose Weekly, and tick Mon and Thu. Click the ⭐ Best time pill — on a Monday that is 12:00. Click Save Schedule. The tile now reads Weekly (2 days) @ 12:00.
- Say whatClick the Post tile. Pick his one template and the Bristol Local collection.
- Say keep goingClick the Loop tile and choose Forever.
- Read the plain sentenceThe Timeline preview underneath says: “Posts to 14 groups, first runs Mon 12:00. Loops forever.” If that sentence is right, the campaign is right.
- Launch itName it Bristol weekly, click Launch, confirm Schedule.
The two mistakes Dave makes
✓What fixes it
- Highlight a phrase, click Vary selected text, type two more ways of saying it. Do that three times. The summary screen flips from amber to green in about thirty seconds.
- If you want a phone number to stand out, use capitals or a line of its own. Not brackets.
✕What he did first
- Sent the identical words to all fourteen groups. The summary screen came back amber: Caution Advised, with the line Identical post text (Spam Risk). One advert with no wordings, sent to ten or more groups, is the pattern it scores as a spam risk.
- Typed Call me on {07700 900412} to make the number stand out. Curly brackets need an upright | bar inside them to do anything. Without one they are printed exactly as typed, brackets and all. His advert went out with the brackets showing.
2 · Marta the online shop — a three-beat product launch
Marta runs a small knitwear and home textiles shop on her own, out of a spare room. She packs her own orders. Facebook groups are already her second-biggest source of sales after email.
Goal: clear the merino beanie restock before the cold snap, over three posts in one week — restock, mid-week reminder, last day.
The post
As spintax
Six sets of brackets → 144 combinations. Green tick: Strong Post Spintax (6 blocks).
The link goes in the first comment — and it is spun too
Under 3. Advanced Automation Settings she opens Comment Settings, picks Add First Comment, and types this into Auto-Comment Content:
At her size this is not optional. An automatic comment with no wordings in it, going to fifteen groups or more, gets a red cross reading Identical Auto-Comment (Spam Risk). A red banner then tells her to add variations. The comment posts itself 15 to 45 seconds after the post, at a slightly different moment each time.
Her collections
She built them with Tools → Segment by Niche, typing buy, nordic, home, knit. One keyword makes one new collection. It copies rather than moves, so the master list survives untouched.
The four arrive named after the keyword they came from, so she renamed them. They are Buy/Sell EU (18), Nordic & Scandi style (11), Home & Living Deals (8), Knitting & Yarn (5). All 42 get the launch.
Schedule
The 3-post launch over a week recipe — a ready-made automation you load, then edit. It lays out: post, wait 2 days, post, wait 2 days, post, then Stop. Trigger set to Wednesday 12:00. The Stop block matters — it stops advertising a beanie that has sold out.
Pacing & spacing
Wait Time 3 min, and Pacing set to Auto — slower on busy days. She will pass 30 posts in a day, so the extension stretches the gaps as it goes. A run that starts as two hours ends up nearer three and a half. She starts it and goes to pack orders.
Order mode
Split (1 per group). Two templates and 42 groups on the other setting would send 84 posts in one day. Split sends 42 — group one gets template A, group two gets template B, and so on.
What came back on the first beat
- A card reading Recovered 3 posts Facebook tried to drop. Under it is the line “We retried and landed them so your run stayed complete.” Those three rows carry a small shield.
- The six that did not land break down like this. Three read “No permission to post in this group” — sale-thread-only groups. Two read “Content Unavailable / Broken Link or Group Deleted”; both of those groups have been shut down. One read “You're not a member of this group”.
- Retrying the two dead groups would fail again. By the end of the week they have failed on all three beats. That is what the cleanup scan waits for: it only puts a group forward after at least three attempts that all failed. She goes to Activity, then History, and clicks Health (the doctor icon, tooltip “Scan for blocked groups”), gets the box Found 2 Dead Groups and clicks Remove Selected Groups.
3 · Sofia the estate agent — two audiences, two identities
Sofia is an independent residential agent working one estate and the three neighbourhoods around it. She sells houses, but what she is really selling is being the local name. She has a business Page and a personal profile she has used for fifteen years.
Goal: three viewings booked on a new listing before Saturday's open house, without irritating the neighbourhood groups.
The listing post
As spintax
Five sets of brackets → 108 combinations. Green tick: Strong Post Spintax (5 blocks).
Her two collections, and why they must stay apart
Property groups — 9 groups, posted as her Page
Homes-for-sale groups, first-time-buyer groups, a landlord group. Listings belong here, and the business name carries more weight than a personal one.
Community groups — 12 groups, posted as herself
Neighbourhood groups, the school-run group, three “can anyone recommend…” groups. Listings are not welcome here, so template B drops the price and the words JUST LISTED, and only mentions the open house. Neighbours reply to a face — and many community groups refuse posts from business Pages outright.
She swaps between the two using the name-and-arrow pill at the top of the panel. Groups, tags and templates are kept separate for each identity, so when she switches to the Page she only sees the Page's groups. If the list looks empty after a switch, that is the separation working, not a fault.
Schedule
One automation, triggered once on Thursday at 12:00. It posts the listing to the property groups as the Page. Then Wait 3 hours, post the softer version to the community groups as herself, then Stop. That is two days' notice before a Saturday open house.
Pacing & spacing
Wait Time 5 min, Pacing left on Use my timing (safe minimum gap). Twenty-one posts spread over about an hour and three quarters looks like a person checking their phone between viewings.
Order mode
Split (1 per group), one template per run — so 9 posts on the first run and 12 on the second.
What came back
The Page run's one failure is the message you will see more than any other: “No permission to post in this group (Facebook: Insufficient permission). If you're posting as a Page, this group may not allow Page posts — try your personal profile, or ask the group admin to enable posting by Pages.” The unconfirmed one is a moderated group; during the run that row showed Awaiting admin approval. The personal run's single failure is a group she was quietly removed from in June.
Her mistake
On her first attempt she ran all 21 groups as the Page, because it looked more professional. Seven of the twelve community groups refused it. Two things then happen that are worth knowing:
- After a group refuses a Page post twice, it is left out of future Page runs automatically and remembered for 60 days. The summary screen tells you, listing up to five group names.
- If three Page posts fail one after another with nothing landing, the whole run stops with: “Stopped: couldn't post as your Page. Facebook keeps resetting your Page session — open Facebook, switch to your Page, close other Facebook tabs, then run again.”
The fix: two collections, two identities. Post to a group by hand once yourself before you put it in a Page collection.
4 · Tom the recruiter — three live roles, one list
Tom runs the industrial desk at a five-person agency: temp-to-perm warehouse labour, paid per placement. A premium job-board slot costs him more per month than a year of this.
Goal: fill six forklift roles by Friday. Interviews Wednesday and Thursday, starts Monday.
The post
As spintax
Six sets of brackets → 144 combinations.
His collections
One collection he posts to, Leeds & Bradford jobs: 14 local jobs boards, 11 city and community groups, 9 warehouse and logistics trade groups. He keeps a second collection called No recruiting that he never posts to — groups whose rules forbid it. Building that took an afternoon of reading group rules by hand. It is the most useful afternoon he has spent.
Schedule
Weekly, Monday and Wednesday at 08:00. The ⭐ Best pill suggests 12:00 on a Monday and he changes it on purpose — warehouse workers check their phone before a shift, not at lunch. He knows his audience better than the suggestion does.
Pacing & spacing
Wait Time 2.5 min with Pacing on Auto — slower on busy days. Over 30 posts the gaps stretch, so an 85-minute run becomes about two and a half hours. He prefers that: the roles trickle into feeds all morning instead of appearing at once.
Order mode
Split (1 per group) — 34 posts, one role per group, cycling through A, B, C and back to A. Plus Rotate templates each run ticked in the schedule box, so group one sees the forklift role this Monday and the picker role next Monday. Over time every group sees every role.
What came back
- Recovered 2 posts Facebook tried to drop — the extension caught two mid-run and landed them.
- The five failures: three read “No permission to post in this group” — jobs boards with a hiring-day rule. One read “You're not a member of this group”. One read “Content Unavailable / Broken Link or Group Deleted”.
- The three unconfirmed rows are all admin-moderated jobs boards.
- On Activity the run is marked Scheduled with the pills ✓ 26 ✕ 5 ? 3.
5 · Dana the agency — four clients, four Pages, one browser
Dana runs a two-person social agency with four regular clients: a yoga studio (14 groups), a deli (9), a law firm (6) and an estate agency (21). Each one posts as its own Facebook Page. Everything is kept separate per Page — the deli's Page can only see the deli's groups. That separation is deliberate.
Goal: get all four clients onto looping automations before she takes on a fifth. She also wants a recap she can forward at Friday's check-ins, without building a slide deck.
The deli's weekly post
As spintax
Five sets of brackets → 48 combinations, which is plenty for nine groups.
Her collections
The deli's nine groups are all local food and neighbourhood groups within walking distance of the shop. A deli draws its customers from about a mile around, so a longer list would be worthless. The law firm's six are business-networking groups only; a law firm has no business in a buy-and-sell group. She copies her reusable post shells between clients with Assets → Post Templates → Import from profile, then rewrites the wording for each client.
The one setting that makes the whole thing work: staggered days
| Client | Groups | Trigger | Wait Time | Pacing |
|---|---|---|---|---|
| Northbeam Yoga | 14 | Weekly, Mon 12:00 | 4 min | Use my timing |
| Harbor & Wolfe Law | 6 | Weekly, Tue 09:00 | 6 min | Use my timing |
| Solano Realty | 21 | Weekly, Wed 12:00 | 3 min | Auto — slower on busy days |
| Copper Vine Deli | 9 | Weekly, Thu 12:00 | 4 min | Use my timing |
Every one is built the same way: Trigger → Post (that client's templates and that client's collection, with Posting Order set to Alternate) → Loop: Forever. The timeline sentence for the deli reads “Posts to 9 groups, first runs Thu 12:00. Loops forever.”
Why spread them out: one browser, one connection. Fifty posts in a single morning is the shape that attracts attention. Four separate days of nine to twenty-one is not.
What came back — the deli's Thursday
The single failure is the usual one: a group that does not allow posts from Pages. Her Friday recap comes straight off the Activity tab. She reads three things there: the Your week card covering the last 7 days, the LAST 30 DAYS ACTIVITY grid, and the Smart advisor line. That last line is worked out from her own history. Until there are enough successful posts to show a pattern, it says so plainly instead of guessing.
Her mistake
She keeps working in other Facebook tabs while a Page run is going. “Acting as this Page” is one setting for the whole browser, not one per tab. Another tab resets it in the middle of a run. Rows then start coming back with this line: “Your Page session was interrupted — close other Facebook tabs and retry.” Three of those in a row and the whole client's run halts.
The fix: start the run, minimise it, and do anything except open another Facebook tab. The small bar it leaves behind says “Safe to edit templates & groups — changes won't affect this run.” Editing inside the extension is fine. A second Facebook tab is not.
6 · Priya the course creator — teach first, sell second
Priya teaches a six-week live sourdough course, three times a year, from her kitchen. Between launches her income is zero, which is the whole problem.
Goal: fill the October course. Doors open Monday, close Friday. She wants three posts: a teaser that gives something genuinely useful away, then a doors-open post, then a last call. She wants to build all three today, because she will be teaching all week.
The teaser — no link, no pitch
As spintax
Four sets of brackets → 24 combinations. Green tick: Strong Post Spintax (4 blocks).
Different beats, different lists
Beat 1 — the teaser, all 26 groups
It is a free technique with nothing asked in return, so it is welcome everywhere — including the two groups whose rules ban promotion outright.
Beats 2 and 3 — doors open and last call, 12 groups
Only the sourdough collection — the twelve groups whose rules permit promotion. She read each group's rules herself. The extension never overrides a group's moderation; staying inside the rules is her job, not the tool's.
The link goes in the first comment
Beat 2 carries a link, so it goes into Auto-Comment Content rather than the post itself, and it is spun as well:
The composer even nudges her about it: “Contains a link. Tip: Placing links in the 'Auto-Comment' instead can double your reach.”
Schedule
The 3-post launch over a week recipe, triggered once on Monday at 12:00. It ends on a Stop block, so when the cart closes the automation closes itself.
Pacing & spacing
Wait Time 4 min, Pacing on Use my timing (safe minimum gap). About an hour and three quarters for the 26-group teaser, about 50 minutes for the two 12-group beats.
Order mode
Each beat's Post block holds a single template, so the Sequential / Alternate control never even appears — it only surfaces once a block has two or more. Nothing to trip over here; Marta's trap is waiting for anyone who puts two in.
What came back
Beat 2's two: one permission refusal, and one row reading “Action completed but flagged by Facebook Spam Detection.” That one did post — Facebook hid it afterwards. That is usually what happens when a promotional post is too close to identical across groups. It is the argument for more wordings, not fewer.
Her second mistake — the one every recipe user makes once
A recipe arrives with its Post block already filled in with every group collection you own and your first template. If she clicks Launch without opening that block, the doors-open post goes to all 26 groups. That includes the two that ban promotion. Always open the Post block after loading a recipe and check what is ticked.
The six side by side
If you are not sure which one you are, this is the shortest version.
| Who | Groups | Templates | Order | Wait | Pacing | When it runs |
|---|---|---|---|---|---|---|
| Dave — plumber | 14 | 1 | Split (1 per group) | 4 min | Use my timing | Weekly, Mon + Thu 12:00, forever |
| Marta — online shop | 42 | 2 | Split / Alternate | 3 min | Auto — slower on busy days | Once, 3 beats over a week, then Stop |
| Sofia — estate agent | 9 + 12 | 2 | Split (1 per group) | 5 min | Use my timing | Once, Thu 12:00, two runs 3 hours apart |
| Tom — recruiter | 34 | 3 | Split + Rotate each run | 2.5 min | Auto — slower on busy days | Weekly, Mon + Wed 08:00 |
| Dana — agency | 50 total | per client | Alternate | 3–6 min | Mixed | One client per weekday, looping |
| Priya — course creator | 26 then 12 | 3 | One template per beat | 4 min | Use my timing | Once, 3 beats over a week, then Stop |
Four things run through all six, and they are the whole method.
- Three or more sets of wordings, every time. It is the difference between a green summary screen and an amber one, and it takes about thirty seconds.
- One template per group, not every template to every group. That is what Split (1 per group) means, and it is what stops a 34-group list turning into 102 posts.
- Slower than feels necessary. Nobody in these six regretted a four-minute gap. Several would have regretted a thirty-second one.
- Read the amber rows before you touch anything. Unconfirmed is not Failed. Look at the group first.
My business isn't any of these six. Which one do I copy?
Count two things: how many groups you post to, and how many different offers you have running at once.
One offer and under twenty groups — copy Dave. One offer, thirty groups or more — copy Dave but move Pacing to Auto — slower on busy days, as Tom does. Several offers at once — copy Tom, one template per offer. Something with a deadline — copy Marta or Priya, and finish the automation with a Stop block so it ends itself.
Do I need a business Page to use this?
No. Four of the six post from an ordinary personal profile. Sofia and Dana use Pages because a business name suits what they are selling. Both of them keep separate collections for the Page, because a great many community groups refuse posts from Pages. If you are not sure, start with your personal profile.
Why does everybody here still get failures?
Because most of them are not failures of the tool. The most common message by a wide margin is “No permission to post in this group”. That means a group where only admins may post, or one that refuses Pages. The next most common is “You're not a member of this group”, which means you left it or were removed. Red does not mean broken; it means read the reason.
The one-page reference
This is the whole page boiled down to the parts you will look up again. A first-day checklist, the words, the buttons, the numbers, and straight answers to the questions people ask most.
Your first day, in ten lines
Each line links back to the step that explains it. If you do only these ten things, you will have posted safely and you will have a copy of your work.
- Understand what it isA small program that lives inside Chrome and posts into your Facebook groups for you. Not a website, not an app on your desktop. Step 1
- Install it and pin the iconInstall it from the Chrome Web Store. Then click the jigsaw-puzzle picture at the top right of Chrome. A short list drops down. Click the pin next to Group Posting Pro, and the icon stays on the bar from then on. Step 2
- Open it on FacebookGo to facebook.com and make sure you are logged in. Then click the icon. A panel slides in from the right-hand edge of the screen. Step 3
- Bring your groups inClick the Assets tab, then Group Collection, then Extract from Facebook. When the scan has finished, click Create New Tag to put your groups into one named list. Step 4
- Write one postGo back to the Create Post tab. Type your post in the big white writing area, under the line reading OR WRITE A FRESH POST. Step 5
- Make it come out differently each timeHighlight a phrase with your mouse. Click Add variations in the row of small buttons above the writing area. Give that phrase two or three other wordings. Do this for three different phrases. Step 10
- Pick a small number of groupsClick the long box at the top of Create Post reading Click to select target group collections for posting to. On your first day, five groups is plenty. Step 6
- Set the pace before you sendClick the grey bar reading 3. Advanced Automation Settings. It unfolds. Leave Avoid night posting switched on. Put Wait Time up to 3 minutes. Step 9
- Press Post Now, then read the two screensThe blue Post Now button sits at the bottom of the panel. Pressing it sends nothing yet. A summary headed Confirm Posting Details comes up first, with its own check on how risky the run looks — read that before you confirm. Afterwards, read the results list group by group. Step 8
- Back up your work today, not laterClick About at the top right of the panel, then Backup All Data. That puts a file on your computer. Then, when you are ready, set tomorrow's post to send itself. Step 17 · Step 13
Where everything lives
The top of the panel never changes, whichever tab you are on. Four small buttons sit on the right of it. Those four hold most of the things people go hunting for.
- Your name and photoWhose Facebook account the post will go out from. Click it to switch between your own profile and any Page you run.
- Your planOn the free plan it counts down your group-posts for today — a group-post is one post going into one group — like Free: 5/5. With a licence it reads PRO LICENSE instead and there is no counter.
- The four small buttonsAI Studio teaches the writing helper about your business. About holds your licence, your language and the backup buttons. Safety shows how careful your settings are. Help gives an email address and a help page.
- The five tabsCreate Post is where you write and send. Assets keeps your saved posts and your group lists. Automations is for runs that repeat themselves. Lead Radar watches groups for people asking for what you sell. Activity shows what is scheduled and what already went out.
Every button on the Create Post screen
This is the screen you will use ninety-nine times out of a hundred. Here it is with the groups of buttons marked, and then a table you can run your finger down. The screen numbers its own three boxes — 1, 2 and 3 — and the table calls them box 1, box 2 and box 3, so that they are never confused with the numbered steps of this guide.
- Where it goesThe long box opens the list of your saved group collections. Advanced selector opens a bigger window where you can also exclude single groups from this one run.
- The writing toolsBold, italic, headings, lists and emoji on the left. On the right, four grey buttons that act on the whole post.
- The three helpersThe blue box holds the writing helper. Beside it, a coloured background for your words, and a place to attach photos or a video.
- The folded drawerEverything about pace, safety and how the posting is done is behind this one grey bar. You do not have to open it. Sensible settings are already chosen.
- The send stripIt stays stuck to the bottom of the panel while everything else scrolls, so you never have to hunt for it.
| Button | Where it sits | What it does |
|---|---|---|
| Click to select target group collections for posting to | Box 1, the long box | Opens the list of your saved group collections. Tick the ones you want. There is a Select all button inside it, and a count that changes as you tick. |
| Advanced selector | Box 1, right | Opens a larger window headed Advanced Group Selection where you can review the target list and exclude single groups from this run. |
| Select saved templates to post... | Box 2, top of the writing box | Picks one or more posts you saved earlier instead of typing a new one. You can use a saved post and fresh text together. |
| B · I · H₁ · H₂ · lists · emoji | Box 2, toolbar left | Ordinary formatting for the words you are typing: bold, italic, two heading sizes, a bulleted list, a numbered list, and a smiley picker. |
| Post Quality | Box 2, toolbar right | Shows a score for what you have written. Before you write anything it reads --. Click it to open the panel that explains the score. |
| Fill from template | Box 2, toolbar right | Pulls a saved post's text into the writing area so you can edit it for today. |
| Save as template | Box 2, toolbar right | Saves what is in the writing area right now — text and attached pictures — as a reusable post. |
| Add variations | Box 2, toolbar right | Opens the helper that writes spintax for you — spintax is a way of writing one post so it comes out slightly different every time. The little note that appears when you rest your mouse pointer on the button says the same thing: it inserts {option A|option B} so each post picks one at random and your posts do not look identical. |
| Improve | Box 2, blue box | Takes what you already wrote and tidies it up. |
| Generate | Box 2, blue box | Writes a post for you from a short instruction you give it. |
| Ideate | Box 2, blue box, the solid one | Opens the ideas panel: the next couple of weeks, what is coming up, and things worth posting about. |
| Background | Box 2, middle box | Opens a grid of eleven colours. Your words go on a coloured card instead of plain white. The first swatch is a white one with a cross through it that turns the colour back off. Rest your mouse pointer on that one and a little note reads None. |
| Add media | Box 2, dashed box | Attaches photos or a video. Click it to browse, or drag files onto it. A small red number appears on its corner showing how many you attached. |
| 3. Advanced Automation Settings | Box 3, the grey bar | Unfolds the drawer holding Interval, Wait Time, Pacing, Avoid night posting, Posting Security Level, Posting Strategy and Comment Settings. |
| The eye | Bottom strip, left of the two buttons | Shows you what the post will look like before you send it. Sends nothing. |
| Schedule for Later | Bottom strip | Opens Schedule Your Post to pick a date, a time, and how often: ONCE, DAILY, WEEKLY or MONTHLY. |
| Post Now | Bottom strip, the big blue one | The only control on this screen that sends anything straight away. It opens the summary headed Confirm Posting Details first — nothing has gone out until you press the second one. |
| Cancel Edit | Bottom strip, hidden most of the time | Only appears while you are editing a post you had already scheduled. It drops the changes and leaves the schedule as it was. |
The words this page taught you
The numbers worth remembering
These are the settings as they arrive, before you change anything. Your own screen is always the final word — if a figure here does not match what you see, believe your screen.
| Thing | Out of the box | Where to change it |
|---|---|---|
| Wait Time — the gap after each post | 2 min | 3. Advanced Automation Settings |
| Interval — posts between waits | 1 post | Same drawer, beside Wait Time |
| Pacing | Use my timing (safe minimum gap) | Same drawer |
| Posting Security Level | Balanced, the middle of three | Same drawer. It only changes anything in Classic Mode. |
| Avoid night posting | On — nothing goes out 10PM to 7AM | Same drawer. Leave it on. |
| Posting Strategy | Speed Mode | Same drawer |
| Warm-up mode (new accounts) | Off | Safety |
| The warm-up ramp, once you switch it on | 5 → 10 → 20 → no limit | Over the first six days, by itself |
| Free allowance | 5 group-posts a day | Counted down at the top of the panel, next to your name |
| Gap before an automatic first comment | 15–45 seconds | Not adjustable — it is random on purpose |
| Rest after Facebook blocks the account | 12 hours | Automatic. Safety shows when it lifts. |
| Groups Lead Radar can watch | up to 25 | On the Lead Radar tab |
| Joining new groups | max 25 a day | The tool's own advice, shown on the joining screen |
| One photo or video file | up to 35 MB | Attach a smaller file if it refuses |
| The extra tab called GPP Command Center closes itself | about 30 min | After you stop using the tool. Leave it alone. |
Questions people actually ask
Will this get my Facebook account banned?
Nobody can promise you it will not. Facebook decides, not this software. The product says as much in its own words on its security page. No tool can promise no risk at all on a platform it does not control, and anyone who claims otherwise is lying to you.
What it does do is behave like a person doing the job by hand:
- It waits between posts.
- It varies the wait.
- It stops at night.
- It warns you before a risky run, instead of after.
- It halts itself the moment Facebook pushes back.
Three things are what actually get people restricted. Posting very fast. Sending word-for-word identical text to twenty or more groups. And doing either of those from an account that has never behaved that way before.
You are still responsible for each group's rules and for Facebook's own terms.
Does it know my Facebook password?
No. It never asks for it and there is nowhere to type it. There is no password box, no sign-up and no login screen anywhere in the tool.
It works the same way you do. You are already signed in to Facebook in this browser, and it uses that. The only two things it reads from Facebook are the small markers that say which account is logged in and which Page you are currently acting as.
Does it keep posting when my computer is off, or asleep, or Chrome is closed?
No. This is the most important thing on this page to get straight. There is no big computer somewhere else doing the work — it is your Chrome, on your desk. The tool says so itself, on the Automations tab under the day's schedule: Your browser must be open for posts to send.
If you set something for nine in the morning, Chrome has to be open at nine in the morning. Nothing is lost if it is not. A repeating post says it was missed and books itself for the next time round. A one-off post is listed under Action Required: Missed Posts, so you can see it and set it again.
Can I use it on my phone or my tablet?
No. It needs a proper computer. It runs on Chrome and Edge on Windows, macOS, Linux and ChromeOS. There is no phone version and no tablet version.
Facebook keeps changing things. Will it stop working?
Facebook changes its inner workings constantly, and the tool was built expecting it. Twice a day it checks in with its own home base and picks up a fix. Most breakages are therefore repaired without you doing anything at all — not even an update.
While that is happening you may see a line under the top bar reading Adapting to a Facebook change — auto-recovering. Your posts are safe. That is the repair, not a fault.
Can I get my saved posts and group lists out of it?
Yes, and you should do it today rather than the day you need it. Open the panel, click About, and press Backup All Data. That writes a file onto your computer. The button's own note tells you what is in it: it saves templates and group collections, but not your photos and videos.
On another computer, or after a reinstall, press Restore from Backup and pick that file.
If you have a paid licence there is also a copy kept online, with buttons marked Save to Cloud and Load from Cloud. That copy happens on its own about once a day. The tool tells you so itself: Nothing to back up yet — add templates or groups and the daily cloud backup starts automatically. It contains the text of your saved posts and the names of your groups.
How do I cancel?
Two ways: cancel from your LemonSqueezy account, which is the shop that took the payment, or email [email protected]. Either way, do it at least 24 hours before your renewal date so the next charge does not go through. You keep Pro until the period you have already paid for ends.
On refunds, the published rule is not a number of days: a paid plan is refundable only while its activation key is unused. The full policy is on the Terms page of the website.
A pinned tab called "GPP Command Center" appeared in my browser by itself. Is that a virus?
No. That tab is the engine — the part that does the posting. It appears on its own when the tool needs it.
It sits at the far left of your row of tabs, pinned. Pinned is Chrome's word for a tab shrunk down to nothing but its small picture, with no title beside it. It closes itself about half an hour after you stop using the tool.
Leave it alone. If you close it while a job is running, it comes back on its own and picks up where it was.
Can I use my computer for other things while it posts?
Yes. Read your email, watch something, whatever you like. The run screen says so itself: You can safely minimize this window or browse other tabs. Automation will continue. You can also shrink the run screen down to a thin bar along the bottom and carry on using the rest of the panel.
One thing to expect if you have switched the posting method to Classic Mode. A small window will open and close over and over while it works. It carries a notice reading Please keep this browser window open. The automation will continue in the background and the tab will close automatically. The normal setting, Speed Mode, opens no windows at all.
What happens if my internet drops out halfway through?
It waits, and then carries on by itself. Every five seconds it quietly tries three different places on the internet, until one of them answers. On screen you see Connection unstable. Waiting... When the internet comes back, that changes to Connection restored. Resuming... and it goes on from where it stopped. You do not have to do anything.
There is a setting called Disable Connectivity Check inside About. Leave it alone. Its own note says to switch it on only if your posts get stuck on "Connection unstable" while your internet is plainly working.
When I installed it, Chrome said it can read and change my data on all websites. Can it read my bank?
That warning is real, and it deserves a proper answer rather than a brush-off. Chrome writes that message from the permission the extension asks Chrome for, and the extension does ask for the broad one.
What it asks for is broad. What it uses is narrow. On any page that is not facebook.com, the extension does two things and no more. It draws its own panel when you click its icon. And it answers a plain "are you there?" check.
Every part of it that reads a page, copies anything off a page, or posts anything is switched off unless the site is facebook.com. The rules it uses to alter what your browser sends and receives all point at Facebook's own web addresses and nowhere else. Its own pages are barred from fetching program code from any other site.
If that is not good enough for you, that is a fair position to take. Do not install it.
Does anything I write get sent to the people who make this?
Here is the whole list, honestly.
Your posts, groups, history and pictures stay on your own computer, inside Chrome. Four things do leave it:
1. If something breaks, a short note saying what broke — a code word, a version number and a language. No post text, no group names, no name of yours. This one has no off switch.
2. A count after each run: how many posted, how many failed, and why. There are two of these. Only the fuller one can be switched off, by clicking About and then turning off Allow Anonymous Usage Data. The short one keeps going, and it carries no words of yours at all — only counts and a fixed set of code words for what went wrong.
3. If you press one of the writing-helper buttons, the text you asked it to write or improve is sent away to be written. That is the only way it can be written.
4. If you have a paid licence, the daily online backup described above — which does include the text of your saved posts and your group names.
How do I stop it this second?
Open the panel and press the red Stop Posting button at the top of the run screen. Here is exactly what that does: it stops before the next group. A post already handed to Facebook a moment ago will still land. You will see Sending stop signal... and then Posting Stopped by User.
If you cannot get to the panel, quit Chrome. The engine is inside Chrome, so closing it stops everything. To stop a repeating campaign for good, pause or delete it on the Automations tab.
How do I remove it, and what happens to my saved work?
Do these in order.
First, open About and press Backup All Data. Removing an extension deletes everything it was keeping on your computer: your saved posts, your group lists, your history. There is no "are you sure?" step to catch you.
Second, if you paid, press Remove Validation Key on that same page. That frees your licence up so you can use it on a different computer later.
Then click the extension's icon at the top of Chrome with the right-hand mouse button, and choose Remove from Chrome from the little menu that appears. A web page opens headed "Group Posting has been removed", asking why you left. You can reply or ignore it.
If you had a paid licence, the online copy of your templates and group list stays on the maker's server after you remove the extension. Email [email protected] if you want that deleted too.
Do I need to make an account, or give a card, before I can try it?
No, to any of it. There is no sign-up in the product and no password to invent. The free plan needs no card.
When you do buy Pro, the shop emails you a licence key. You paste that key in by clicking About and then Activate License Key. There is still no account to create.
How will I know when a run has finished if I am not watching?
A small message appears in the corner of your screen, even if Chrome is minimised. It reads GPP — all posts published ✅ if everything went out, or GPP — partly done ⚠️ with how many need another look.
There are similar messages for three other things: the tool stopping for your safety, Facebook asking you to prove who you are, and you being logged out. Each one says what to do about it.
Do I have to update it myself?
No. Chrome updates extensions from the Web Store on its own, and this one deliberately shows you nothing when it does. If you want to know which version you are on, open About — the version is printed at the top right of that page.
Can I use it on two computers?
Your licence key covers a set number of switched-on computers. That number is set by the shop, not by the extension. So check your own purchase email or the pricing page, rather than trusting a number written anywhere else.
Moving from one machine to another takes two steps. On the old machine, open About and press Remove Validation Key. On the new one, press Activate License Key and paste the key in. If you have used all your slots, the message you get says exactly that, and tells you to free one up the same way.
Does it work in a second Chrome profile, or in an Incognito window?
A Chrome profile is Chrome's way of keeping two separate users on one computer, each with their own bookmarks and their own logins. A second profile gets a completely separate, empty copy of the tool: its own groups, its own saved posts, its own history, and its own licence slot. Nothing carries across. Agencies use exactly this to keep clients apart.
An Incognito window — the private window Chrome opens when you ask it not to keep a record of where you went — is not something we can promise you. Chrome handles extensions differently in there, and the tool says nothing about it either way. Use an ordinary window.
I pressed Post Now and nothing happened.
Two ordinary causes, both with a one-click fix.
If a box appears headed Engine Sleeping saying The background engine was asleep. Please click 'Post Now' again to wake it up. — press the button again. Chrome puts the engine to sleep when it is idle, and the second press wakes it. That is not a fault.
If the panel itself seems dead, you may see Group Posting Pro didn't respond. Close this window and open the extension again — if it keeps happening, restart Chrome. Your licence key has not been used up. Do exactly that, in that order.
One row in my results says "Unconfirmed". Did it post or not?
It may have. That is the honest answer, and it is why the tool has a third word instead of calling it a failure. The row says so itself: We couldn't confirm this post — it may have posted. Check the group before re-posting to avoid a duplicate.
The usual reason is that the group holds new posts for an admin to approve. Click the group name, look, and then decide. The Retry Failed Posts button deliberately leaves unconfirmed rows alone, precisely so you do not end up with the same post twice in a moderated group.
A box appeared asking me to give it stars. What is that?
It is the tool asking what you think of it, and it only asks after a run in which everything posted and nothing failed. It comes on the third such run, then the tenth, then the twenty-fifth, and never at any other time. The box is headed How are we doing? with five stars; Submit Rating stays greyed out until you click one of them.
Give it four or five and it asks you to leave a review, with Rate on Store. Give it one, two or three and it asks what went wrong instead, with Give Feedback, which opens a short form. Sometimes it also offers to put your day's group-posts back up to the full allowance as a thank-you; that offer is decided after you answer, so it is not always there.
Maybe Later puts it away for a week. Answering once puts it away for good. Nothing about your posting changes either way.
Where do I get help from a person?
Press Help at the top right of the panel. It shows you both: an email address, [email protected], and a help page at groupposting.com/help. Billing questions go to [email protected].
If you are writing about something that went wrong, open Safety first and press Run diagnostic, then Copy diagnostic, and paste that into your email. It saves a day of back-and-forth.
What to do next
Close this page and do the ten lines at the top. Not all of them today. The first four are enough for one sitting, and the fifth through ninth are enough for the next. Line ten, the backup, is the one to do the moment you have anything worth keeping.
The people who get value out of this tool are not the ones who read the most. They are the ones who got one small run out of the door and then looked at what came back.
Then leave it alone for a day. Post to five groups, not fifty. Wait three minutes between them, not thirty seconds. Write your post three different ways before you go anywhere near twenty groups.
Do that for a fortnight and you can then widen out to as many groups as you have. An account with that kind of history behind it is far less likely to be pulled up than one that starts at full volume. Less likely is the honest word: nobody can promise you Facebook will leave you alone.
That is the whole trick, and it is a dull one: going slowly is what lets you keep going at all.